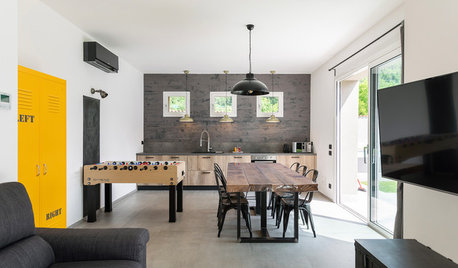
Key Measurements: Recreation Rooms Rule
Recreation rooms are one of those spaces that can require space that easily extends beyond the square footage of the average home. Traditional games such as pool and table tennis demand dedicated space, but there are many home games that could fit on a tabletop. Let’s find out what games your home could host by taking a look at the dimensions of some of the favorites.
Pool Tables
Pool tables are available in several sizes, and the most common ones are designated as 9-, 8- and 7-foot. The actual dimensions are as follows:
9 ft.: 5 ft., 2 in. wide and 9 ft., 4 in. long
8 ft.: 4 ft., 8 in. wide and 8 ft., 4 in. long
7 ft.: 4 ft., 2 in. wide and 7 ft., 4 in. long
All tables are 30 in. high and need a clear space above the table of at least 30 in. from hanging light fixtures. You will need at least 5 ft. clear around the table and next to walls with an addition of 2 ft. or more when placed next to other furnishings such as another game table. Considering the overall size of the pool table and the area required to function, you may need as much as 300 square feet dedicated to it.
The floor must be level, and it will need to support as much as 3,000 pounds, the weight of a traditional wooden pool table. You must provide diffused lighting with a rating of 375 lumens on the playing surface, which is about three 150-watt incandescent bulbs. Sharp shadows and fluorescent lighting should be avoided.
Table Tennis
Table tennis is another space eater when it comes to recreation rooms. The tables come in just one size, 5 ft. wide; 9 ft., 6 in. long; and 30 in. high. You need at least 7 ft. at each end of the table, and 4 ft. on each side clear to the walls. You should add a couple of extra feet if the table will be placed next to other furnishings. Similar to a pool table, it requires about 300 square ft.; though the required footprint is narrower, it needs more than 23 ft. in length.
Steps to Navigating a Remodel With Your Partner
Remodeling is challenging under the best of circumstances — but what do you do when you and your partner seem to disagree every step of the way? If planning for your project has hit a rocky patch, consider this your intervention.
Look at the Big Picture First
It’s important to start from a positive, we’re-in-this-together place, and a good way to do that is by sitting down to share your grandest goals. Think of this as several levels up from talking about paint colors and decor styles — this is the foundation of your project, and something you can return to when you disagree.
Here are a few questions to spark conversation.
How do you want our new space to make you feel when spending time there?
What activities do you envision happening there?
How do you see us using this space now? What about in five years?
Name Your Top Priorities
When you get into the messy middle of your project, it’s easy to start viewing every decision as carrying equal importance, from the number of square feet to the wood finish on the floors. But giving everything equal weight is a recipe for conflict. A good way to begin with an open mind is to create your own personal list of top priorities. Each person’s list should contain no more than three to five priorities, with just one item starred as the No. 1 priority. This allows you to take a bigger-picture view of the project, recognizing that, although certain things are very important to you, there are certainly plenty of other areas where you might find more wiggle room.
Do a List Swap
Once you have your lists of top priorities, begin fleshing them out with more ideas and wishes for your project. With these longer lists in hand, try a list swap. This exercise, developed by couples therapist and clinical sexologist and shared in a previous story, can help partners find more places to compromise and agree. who used to teach classes to couples on how to navigate a remodeling project, suggests that significant others exchange lists — then each person circles things that are similar, checks items they can compromise on and crosses out ideas they completely disagree on.
Are You a Manager, a Micromanager or a Hands-Off Remodeler?
When you’re planning a remodel, there is plenty to think about. But one thing that might not be on your radar is your level of interaction with the process and, by extension, with the pros involved. How this plays out can impact everything from the length of time a project takes to your overall satisfaction with the work.
This guide will walk you through the pros and cons of three very different approaches to working with contractors and other pros — as a manager, a micromanager or a hands-off remodeler. Read on to learn about these styles, and then tell us in the Comments which approach has worked best for you.
The Manager
Why being a manager can be a good thing. In a sense, as the homeowner, you are the overall manager, no matter what the project is. It’s your money and on your property where the work is happening. Even if you have an official project manager (and for nearly any remodeling project, that’s a very good idea), there is still room for you as the homeowner to act as a sort of big-picture manager. Taking care to keep good records, track your finances and generally have a healthy sense of where things are going is part of being a responsible manager. A good manager doesn’t hide from potential challenges, communicates clearly and effectively, and voices concerns rather than letting things fester.
Drawbacks to being the manager. There’s a difference between holding up your end of the responsibilities and simply jumping in and trying to take over. Jumping in frequently to check in on how things are progressing can be perceived by your contractor as overstepping. Stepping in too frequently also can disrupt work and create more confusion than it resolves.
Takeaway: Clearly define your official role. Are you hiring a project manager? This could be your general contractor, a designer or an architect. If you are, it’s important to recognize that you are actually paying this person to handle the management of your team and project. If not, you are by necessity taking on the role of project manager — a very different scenario! In the (more common) case, in which you have hired a project manager, it’s important to clearly define where your role ends and your contractor’s or designer’s role begins. It can help to sit down with your contractor before work begins to go over exactly what each party will be responsible for, and where those responsibilities might overlap.
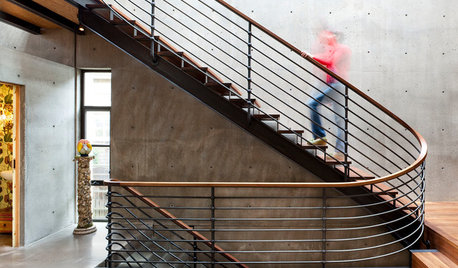
Key Measurements for a Heavenly Stairway
Some stairways are easier to ascend than others, and there are reasons for that. The parameters of stair design are set by building codes, and there are also recommended configurations based on average human proportions.
There are, for example, tread-width-to-riser height relationships that make stairs more comfortable for the average person to traverse. Building codes set a minimum for staircase width, but wider dimensions are often necessary. Other important considerations are head clearance, railing dimensions and landings.
Calculating Staircase Square Footage
Since they require so much space, efficient staircases must be designed. The trick is a balance of comfort and efficiency that satisfies the building code and enhances the architecture of the space.
The length of the run is the total dimension the treads must occupy to complete the required rise. Staircases use significant square footage by the time all the steps are in place, landings are located and headroom has been cleared.
Consider that if a tread is 12 inches and you need 19 of them, that is 19 feet for the length of the steps alone. Now add at least 3 ft. on each end for landings, and you have 25 ft. in which to place that stairway path, at minimum. When you multiply the 25-ft. length times the 4-ft. width, which includes the railing and the wall, you have a 100-square-foot area that is required for that staircase. Double those figures to account for the hall or path to go around the staircase, and you have 200 square feet for one staircase. This is the size of a single-car garage.
March Motivation: Advice for Rebooting Your Home Projects
Decision fatigue, disagreements, lack of follow-through, budget issues and even the weather — home projects can stall out for all sorts of reasons. Being able to pinpoint the reason your project got stuck (or never really got started) in the first place will help you choose a good first step to get the ball rolling again. If you’d love to get your home project restarted, this guide is a good place to begin.
Pinpoint the Reason Your Project Stalled
When you think about your stalled-out project, what problem or issue comes to mind first? If you’re having trouble pinning down the reason for the roadblock, it may help to think about it in terms of phases of work
Here are a few examples of issues that can crop up at each stage of the process.
Big-idea stage: Indecision or disagreement about the vision or project scope
Preparation stage: Trouble deciding exactly what you want; budget issues
Team-building stage: Difficulties in hiring the right pro (or pros) for the job
Planning stage: Team communication breakdown; decision fatigue
Construction stage: Delays; miscommunication; feeling generally overwhelmed
Pick One Simple First Step
Once you can name the main reason your project got put on the back burner, it’s time to pick one small task that can help get things back on track. Choose something that feels straightforward and doable. Create a ideabook, call your architect or sit down with your partner to discuss the project.
Why You Stopped: Decision Fatigue
Even in a relatively “small” project, the number of decisions required can be truly mind-boggling. If you were up to your eyeballs in paint swatches and fabric samples and just couldn’t take it anymore, it’s no wonder — our everyday lives are already filled to overflowing with decisions to be made! Once you’ve had a chance to do some deep breathing, a good first step before you dive back into your project is to get organized.