Author Archives: dustin

Creative Home Remodeling

Key Measurements: Recreation Rooms Rule

Recreation rooms are one of those spaces that can require space that easily extends beyond the square footage of the average home. Traditional games such as pool and table tennis demand dedicated space, but there are many home games that could fit on a tabletop. Let’s find out what games your home could host by taking a look at the dimensions of some of the favorites.

Pool Tables

Pool tables are available in several sizes, and the most common ones are designated as 9-, 8- and 7-foot. The actual dimensions are as follows:

9 ft.: 5 ft., 2 in. wide and 9 ft., 4 in. long

8 ft.: 4 ft., 8 in. wide and 8 ft., 4 in. long

7 ft.: 4 ft., 2 in. wide and 7 ft., 4 in. long

All tables are 30 in. high and need a clear space above the table of at least 30 in. from hanging light fixtures. You will need at least 5 ft. clear around the table and next to walls with an addition of 2 ft. or more when placed next to other furnishings such as another game table. Considering the overall size of the pool table and the area required to function, you may need as much as 300 square feet dedicated to it.

The floor must be level, and it will need to support as much as 3,000 pounds, the weight of a traditional wooden pool table. You must provide diffused lighting with a rating of 375 lumens on the playing surface, which is about three 150-watt incandescent bulbs. Sharp shadows and fluorescent lighting should be avoided.

Table Tennis

Table tennis is another space eater when it comes to recreation rooms. The tables come in just one size, 5 ft. wide; 9 ft., 6 in. long; and 30 in. high. You need at least 7 ft. at each end of the table, and 4 ft. on each side clear to the walls. You should add a couple of extra feet if the table will be placed next to other furnishings. Similar to a pool table, it requires about 300 square ft.; though the required footprint is narrower, it needs more than 23 ft. in length.

Steps to Navigating a Remodel With Your Partner

Remodeling is challenging under the best of circumstances — but what do you do when you and your partner seem to disagree every step of the way? If planning for your project has hit a rocky patch, consider this your intervention.

Look at the Big Picture First

It’s important to start from a positive, we’re-in-this-together place, and a good way to do that is by sitting down to share your grandest goals. Think of this as several levels up from talking about paint colors and decor styles — this is the foundation of your project, and something you can return to when you disagree.

Here are a few questions to spark conversation.

How do you want our new space to make you feel when spending time there?

What activities do you envision happening there?

How do you see us using this space now? What about in five years?

Name Your Top Priorities

When you get into the messy middle of your project, it’s easy to start viewing every decision as carrying equal importance, from the number of square feet to the wood finish on the floors. But giving everything equal weight is a recipe for conflict. A good way to begin with an open mind is to create your own personal list of top priorities. Each person’s list should contain no more than three to five priorities, with just one item starred as the No. 1 priority. This allows you to take a bigger-picture view of the project, recognizing that, although certain things are very important to you, there are certainly plenty of other areas where you might find more wiggle room.

Do a List Swap

Once you have your lists of top priorities, begin fleshing them out with more ideas and wishes for your project. With these longer lists in hand, try a list swap. This exercise, developed by couples therapist and clinical sexologist and shared in a previous story, can help partners find more places to compromise and agree. who used to teach classes to couples on how to navigate a remodeling project, suggests that significant others exchange lists — then each person circles things that are similar, checks items they can compromise on and crosses out ideas they completely disagree on.

Are You a Manager, a Micromanager or a Hands-Off Remodeler?

When you’re planning a remodel, there is plenty to think about. But one thing that might not be on your radar is your level of interaction with the process and, by extension, with the pros involved. How this plays out can impact everything from the length of time a project takes to your overall satisfaction with the work.

This guide will walk you through the pros and cons of three very different approaches to working with contractors and other pros — as a manager, a micromanager or a hands-off remodeler. Read on to learn about these styles, and then tell us in the Comments which approach has worked best for you.

The Manager

Why being a manager can be a good thing. In a sense, as the homeowner, you are the overall manager, no matter what the project is. It’s your money and on your property where the work is happening. Even if you have an official project manager (and for nearly any remodeling project, that’s a very good idea), there is still room for you as the homeowner to act as a sort of big-picture manager. Taking care to keep good records, track your finances and generally have a healthy sense of where things are going is part of being a responsible manager. A good manager doesn’t hide from potential challenges, communicates clearly and effectively, and voices concerns rather than letting things fester.

Drawbacks to being the manager. There’s a difference between holding up your end of the responsibilities and simply jumping in and trying to take over. Jumping in frequently to check in on how things are progressing can be perceived by your contractor as overstepping. Stepping in too frequently also can disrupt work and create more confusion than it resolves.

Takeaway: Clearly define your official role. Are you hiring a project manager? This could be your general contractor, a designer or an architect. If you are, it’s important to recognize that you are actually paying this person to handle the management of your team and project. If not, you are by necessity taking on the role of project manager — a very different scenario! In the (more common) case, in which you have hired a project manager, it’s important to clearly define where your role ends and your contractor’s or designer’s role begins. It can help to sit down with your contractor before work begins to go over exactly what each party will be responsible for, and where those responsibilities might overlap.

Key Measurements for a Heavenly Stairway

Some stairways are easier to ascend than others, and there are reasons for that. The parameters of stair design are set by building codes, and there are also recommended configurations based on average human proportions.

There are, for example, tread-width-to-riser height relationships that make stairs more comfortable for the average person to traverse. Building codes set a minimum for staircase width, but wider dimensions are often necessary. Other important considerations are head clearance, railing dimensions and landings.

Calculating Staircase Square Footage

Since they require so much space, efficient staircases must be designed. The trick is a balance of comfort and efficiency that satisfies the building code and enhances the architecture of the space.

The length of the run is the total dimension the treads must occupy to complete the required rise. Staircases use significant square footage by the time all the steps are in place, landings are located and headroom has been cleared.

Consider that if a tread is 12 inches and you need 19 of them, that is 19 feet for the length of the steps alone. Now add at least 3 ft. on each end for landings, and you have 25 ft. in which to place that stairway path, at minimum. When you multiply the 25-ft. length times the 4-ft. width, which includes the railing and the wall, you have a 100-square-foot area that is required for that staircase. Double those figures to account for the hall or path to go around the staircase, and you have 200 square feet for one staircase. This is the size of a single-car garage.

March Motivation: Advice for Rebooting Your Home Projects

Decision fatigue, disagreements, lack of follow-through, budget issues and even the weather — home projects can stall out for all sorts of reasons. Being able to pinpoint the reason your project got stuck (or never really got started) in the first place will help you choose a good first step to get the ball rolling again. If you’d love to get your home project restarted, this guide is a good place to begin.

Pinpoint the Reason Your Project Stalled

When you think about your stalled-out project, what problem or issue comes to mind first? If you’re having trouble pinning down the reason for the roadblock, it may help to think about it in terms of phases of work

Here are a few examples of issues that can crop up at each stage of the process.

Big-idea stage: Indecision or disagreement about the vision or project scope

Preparation stage: Trouble deciding exactly what you want; budget issues

Team-building stage: Difficulties in hiring the right pro (or pros) for the job

Planning stage: Team communication breakdown; decision fatigue

Construction stage: Delays; miscommunication; feeling generally overwhelmed

Pick One Simple First Step

Once you can name the main reason your project got put on the back burner, it’s time to pick one small task that can help get things back on track. Choose something that feels straightforward and doable. Create a ideabook, call your architect or sit down with your partner to discuss the project.

Why You Stopped: Decision Fatigue

Even in a relatively “small” project, the number of decisions required can be truly mind-boggling. If you were up to your eyeballs in paint swatches and fabric samples and just couldn’t take it anymore, it’s no wonder — our everyday lives are already filled to overflowing with decisions to be made! Once you’ve had a chance to do some deep breathing, a good first step before you dive back into your project is to get organized.

Hardwood Flooring Offers Unique Looks In Floors

Are bare feet bad for hardwood floors?

Most parents and professional cleaners have a legitimate reason for wanting to keep outdoor shoes, well, outdoors, and that has to do with keeping the soles of our shoes from tracking dirt, grime, toxins like pesticides and industrial pollution, and traces of both human and animal waste into our homes. Outdoor shoes are even known to offer free passes to bacteria that can cause health issues, although that risk could be slightly exaggerated, according to The New York Times.

Many cultures practice shoe-free homes across Asia and the Middle East. But is the option of going barefoot — or perhaps just wearing soft fluffy slippers — at home a habit we should all be adopting? According to some podiatrists, the answer is a resounding, “no.” And it’s not because they aren’t concerned about having us invite a few germs and some grime into the house. Rather, they worry that going barefoot around the house could open up our feet to developing different types of structural injuries.

Hardwood Floors May Be Killing Your Feet

“My feet are killing me” is a common phrase we hear from patients suffering from foot and heel pain. Your hardwood floors may not actually be killing you, but they are likely irritating your feet. The days of green shag carpet—which offered shock absorption and comfort for our feet—have been replaced by stiff surfaces like hardwoods, laminates, and tile that cause more wear and tear on our feet. So if you find yourself missing the days of green shag carpet, you are not alone. Your feet miss it too!

Where do you find long stretches of concrete sidewalks, tile floors, or hardwood floors occurring naturally? The answer is nowhere. Humans have been wearing variations of shoes for thousands of years, but the increase in foot and heel pain may be related to more recent decorative changes.

As we’ve moved from shag carpets to laminates, hardwood, and tile floors, our feet have paid the price. More and more people have begun suffering from plantar fasciitis. Plantar fasciitis is an inflammation of the tissues at the bottom of the foot and a leading cause of foot pain. This can lead to pain in the arches or heels of the foot, which worsens when the foot pronates or flattens on hard surfaces. The pain can be severe and debilitating.

Noninvasive treatments to consider:

Did you know that chiropractors can do adjustments on feet? There are 26 bones in the foot, and just like the spine, the mobility of these joints can become restricted. When it comes to the cause of plantar fasciitis, studies have shown that “Reduced ankle dorsiflexion appears to be the most important risk factor.”  This means that reduced ankle movement is an underlying cause of the pain. Improved joint mobility can minimize pain and eliminate dysfunction.

Patients have had great success with therapeutic foot taping, custom orthotics, and of course, chiropractic adjustments. Over-the-counter insoles can be beneficial, however, custom orthotics do tailor to each foot’s unique arch.

The good news though is that nonsurgical management of plantar fasciitis is successful in about 90 percent of patients. So there is hope—even if you dearly love your hardwood floors!”

 As with most conditions, conservative treatment works best at the start of foot and heel pain. See a professional sooner rather than later if you are struggling with foot and heel pain.

Wearing shoes will protect your feet against bacteria and fungi

If you’re a germaphobe, this may put you off going around your house in bare feet for life: Your floors may be clean, but they can’t really ever be completely germ free, and walking barefoot indoors exposes your feet to potential infections caused by bacteria and fungi. These organisms first infect the skin, and then they may infect the nails, leading to thickening, discoloration and brittleness of the nails. Both conditions become not only unsightly but also contribute to an unpleasant odor. 

The best way to protect your feet is to pick up a good pair of indoor shoes, which you can change into when you get home. Doctors recommend looking for a pair that provides good arch support, particularly if you already suffer from a foot condition, such as weak arches or bunions.

Wood Flooring: 5 Costly Mistakes You Can Avoid

Wood flooring is one of the top choices, as it has been throughout the years. It adds elegance and warmth to a room, and it is versatile in that homeowners can add stains for changes in color or top with an accent rug for a softer feel. Many homes that have original wood flooring can use this as a selling point, and buyers pay top dollar for wood floors that are in good condition

1. Not engaging in preventative measures

Before anyone walks across the new wood floor, make sure to take some preventative measures. Place doormats at all doorways so that family members and guests can wipe their shoes before walking into your home. Cover the legs of all pieces of furniture with felt so that they can easily slide in and out without the metal feet scratching the floors. Think about strategic placement of runners and area rugs in high traffic areas. These are only some of the ways that you can be your wood floor’s best ally.

2. Using abrasive cleaning products

When it comes to wood floors, there are certain cleaning products and chemicals that should never touch the surface. If your floor has a coat of sealant or lacquer, you should use different cleaning products than if it is unfinished.

All wood floors can be swept with a broom or dry mop, but avoid using chemicals that can deteriorate the finish or warp the wood. If you use liquid floor cleaner, apply it to the mop or cloth instead of pouring it directly onto the floor. When shopping for flooring cleaning products, tell your vendor exactly what kind of wood floor you’ve got. And then proceed accordingly.

3. Forgetting about your pets and their habits

Animals can cause a lot of damage to wood floors, whether from an accident that is left untreated or from long nails that can cause scratches and dings. Clean up any spills or accidents as soon as they happen to prevent warping, and keep their nails trimmed. See your vet on how to do this properly. Additionally, if food or water bowls sit on the floor, keep silicone mats beneath them so that spills don’t seep into the floor.

4. Wearing shoes indoors

High heeled shoes can ding and dent a wood floor, so ask guests to remove their shoes, and always remove yours when you come into your home. These shoes are more damaging when they don’t have rubber heel protectors since they can basically become chisels that make holes in the wood.

Dirty or wet shoes can also cause the floors to warp and shift, so the best option is to simply walk barefoot or in socks when walking on the hardwood. Or, if you really want to keep your feet warm, wear comfy indoor slippers. Be comfortable, and protect your wood floors at the same time.

5. Using aggressive cleaning tools

Steam mops might seem like a good way to remove bacteria from wood floors, but they can result in serious damage. Use minimal amounts of cleaning products on your floors, and always use soft towels to wipe up the floors. An antibacterial floor cleaner is a better way to eliminate germs and bacteria on the floors.

How Important Is The Interior Painting To Match With The Bedroom Interior Design

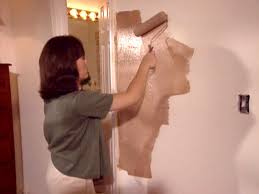
How to Faux Paint a Wall

Faux painting involves applying different glazes to a wall in order to give it the look of a weathered, textured surface. Common faux paints include marble, brick, and wood. A common alternative to paint, faux paint allows one to vary the consistency of a wall’s color and texture while giving the illusion of having a much more expensive material. There are three common techniques for faux painting. Color wash includes a glaze applied in overlapping brush strokes to produce a worn appearance. Sponging involves using a sponge to apply glaze for a more textured look. Ragging includes the use of a rag or towel to give the wall a milder, more variable style. The preparation for all of these methods is the same.

Choosing a Faux Painting Technique

Decide whether you want a smoother or a more worn look.

Ragging generally gives the smoothest texture. Color wash gives the most worn look, while sponging gives a very textured appearance.

Decide how many coats of paint you want.

The more paint you add to your surface, the more textured the surface will appear. A single coat leaves brush or rag marks on the wall, while a second coat will mostly cover these and provide a more even appearance.

Choosing Faux Paint and Materials

Pick a color for your faux paint.

Look at paint samples in a store to see how paint will appear when applied. You can tweak the brightness of the paint by adding a light or darker base coat, and you can also mix two colors to create different tones.

Purchase your faux paint and painting materials.

Buy the paint, base coat, and other materials–a brush, rag, or sponge, as well spackling paste for filling irregularities in the wall–at a paint or home supply store. Consult sales staff to make sure you are buying the right colors for your faux paint and base coat.

Faux Finishes You Can Do Yourself

Faux Malachite

You mean we’re NOT looking at a table made from crystallized minerals? To make this stunning faux finish, paint a base layer in a bright green mint or teal color. Then, with different shades of darker teal (each in a mixture of one part paint to three parts glaze), use brushes of varying size to create rock-like swirls, layering them slightly over each other.

Faux Marble

I know what you’re thinking—you can’t tell the difference between the real marble and the imitation! With nothing but a feather and three different shades of gray craft paint, the blogger at In My Own Style made her countertop look like actual marble.

Faux Bois

Want to pretend your laminate shelf is actually wood? Well, the Little Green Notebook has got you covered. Once you paint your base color, mix the color of your grain using one part oil-based paint to one part thinner or Penetrol. Paint your surface in sections, then use a wood-grain rocker to form the grain. Make sure to vary your technique to imitate the variations found in a real wood surface.

Faux Exposed Brick

Want some brick where you’ve got none? Well, if you’re up for a bigger undertaking, you—like the intrepid weekend warrior at Do-It-YourselfDesign—can DIY it! Measure and tape the outline for your “bricks” on your wall, then cover with interior stucco. When the stucco is dry to the touch but still soft, remove the tape. Once the wall is completely dry, paint it white and your room will look like it belongs in a NYC brownstone!

Graining.

With faux bois being a recent hot trend in interiors, graining might be the way to go in faux finishes. Purchase a graining tool (specially designed for creating a wood-grain finish), then drag it gently down or across a wet glazed or painted surface. Be sure to rock the graining tool as you go in random, varied spots, to mimic the natural course of wood grain.

Sponging.

The use of a sponge in faux painting has been around for years; it’s a staple in the faux finishing world. Lightly dip a dry sponge into the paint and gently push it onto the surface you’re working with. The key to sponging is to do multiple layers, each very light, to build up to the color density you’re after. You want the sponged colors to be as even as possible across the entire surface. Consider using slightly different shades of the same color for a subtle depth in your finished faux surface.

Stripes:

Stripes are a classic design element that can add interest to any room. Adding stripes to your walls with paint is a technique that gives you the freedom to create original, personalized vertical or horizontal patterns that reflect your taste and lets you customize the colors to match your décor.

Plan out your design — do you want vertical or horizontal stripes? Do you want to paint them on an accent wall or throughout the whole room, or something else outside the box? Choose a color scheme. It’s common to choose two shades of the same color, but you don’t have to limit yourself. For a bolder effect, try contrasting colors that complement one another. For a more subtle striping effect, use the same color for the basecoat and the stripes, but in different finishes. You can be more contemporary by using stripes in varying widths.

Creative Faux Finish Ideas for your Bare Walls

Get inspired by your most loved fabrics and materials

Whether you love the rough appeal of burlap and seagrass or the ultra smoothness of leather and suede, there are many painting techniques to transform your wall. First find fabrics and textiles that evoke an emotion in you that you’d love to carry onto your walls. Depending on your design style, try out a small area first before painting the entire wall!

Using your ceiling to add gorgeous faux finishes

Your ceiling or 5th wall as it is referred to by designers is one of the best places to apply faux finish techniques. Your ceiling is often a missed opportunity to add color, texture and to transform a boring white painted ceiling into a whole other world! When choosing the technique that best fits your decor remember for do it yourself painting to use scaffolding or other safety equipment when applying paint.

Old world style to your modern home

Do you love the appeal of the Mediterranean to your interiors? Try faux finish techniques from distressing, graining, and layering or sponging on a variety of colors to add depth and to age your walls. This technique is perfect for interiors that want to bring a Tuscan or aged “patina” look to their interiors. This technique is common on ceilings in dining rooms and master bedrooms.

Using plaster to bring a rustic appearance to your room

In many European homes and even early Americana homes, plaster was the material of choice for interior walls as it was durable and could be given many different surfaces. Today, drywall is the finish of choice for most interiors, but if you love the rustic appeal of plaster try using a special primer paint and plaster faux finish sold at most paint stores. Perfect for light switch and electrical plates too!

How To Choose A Wedding Photographer

How To Become a Professional Wedding Photographer

Whether you want to know how to become a professional commercial photographer or how to become a professional photographer in general, the quickest way to start making money with your camera may be wedding photography.

The goal behind this 14 tutorial was to create the most comprehensive resource on everything it takes to create compelling wedding images as well as the tools needed to start and run a successful wedding photography business. No matter if you are brand new to photography or if you are already shooting weddings professionally

Why Wedding Photography?

As we explain in the promo video above, wedding photography pretty much fell into both of our laps. I believe many photographers have the same wrongfully biased opinion about wedding photography as I did when I first picked up a camera. The idea of dealing with dramatic bridezillas, going hours without food or drink, and having to take cheesy photographs all day was not my idea of a good day at work.

The most interesting thing about wedding photography is that there is a market in every single city. I believe wedding photography offers an amazing opportunity for anyone interested in photography as a hobby or career; through wedding photography, you can become 100% self employed as a full time photographer!

goal with this tutorial isn’t to make everyone a millionaire or turn you into some sort of rockstar wedding photographer. I aren’t either of those things. What want to teach you is how you can take better photographs, start your own business, and hopefully shave off at least three years of trial and error during those initial startup years

TIPS WHEN PLANNING A WEDDING TIMELINE

LEAVE A CUSHION

The biggest mistake I see couples make is running their timeline to the minute. When Planning a wedding timeline leave a cushion. I consider weddings to be organized chaos. A day full of love, tears, and excitement – mix in a little alcohol and there you have it, organized chaos. Something always comes up and it will, I promise.

TRAVEL TIME

Make sure you plan for travel time. Not only for you but for your photographer and other venders that have to travel to multiple locations. While you can just walk out of the hotel, church or into your reception, it takes your photographer time to pack everything up, get to the car, drive to the next location and unpack the gear to be ready for the next shoot.

SUNSET TIME

When planning a wedding timeline remember every season has it challenges. Some weddings have to deal with the heat, cold, rainy season and humidity, but they all have one thing in common, sunset. The most flattering light of the day is what photographers refer to as “Golden Hour” which happens about an hour before sunset. So, when planning your ceremony, if you want to be shooting in that beautiful light, be familiar with sunset time. If you are having a winter wedding, remember sunset can happen as early as 4:30. So if you are ceremony is at 6pm in the winter it will be limited to inside photos after the ceremony.

DESIGNATE A PHOTO WRANGLER

This could be one of your best decisions and this person could save your timeline. Your photographer will not always know the faces of all the people on your formal shoot list but a family member or friend that knows them is priceless. As your photographer is shooting one group, the Wrangler can get the next group ready. This way you can shuffle through them quickly, organized and stay on schedule.

ESTABLISH A WEDDING WEBSITE

This one takes a little more work for you on the front end when planning a timeline, but will save your sanity by not have to answer the same phone call from all your family and friends. Here your guests can find all the information they need about your wedding day as well as nearby hotels, restaurants, and things to do when not at your wedding.

WHAT A FIRST TIME WEDDING PHOTOGRAPHER NEEDS TO KNOW

The news that you are photographing your first wedding often leads to emotions ranging from excitement to apprehension, and in some cases, fear. Assuming you have experience with your equipment and have developed the necessary skills to take great photographs, the wedding event has a greater likelihood of being a successful one if you follow some key steps.

BEFORE THE WEDDING

Proper preparation before the event is the best way for a photographer to have a successful outcome. I spent several weeks before my first wedding visiting other photographers’ web sites. I read books on wedding photography, and I researched photography blogs and forums. It is amazing how much information is available for little or no charge. These tips and photographs can inspire you and get you thinking about what you want to accomplish and how you are going to make it happen.

It is important that you have a standard written agreement that is signed by the bride- and groom-to-be and the photographer. There is no excuse for not having this document in place. It should describe the deliverables and the fees associated with the service and products. It should also include a model release so you can use the photos for promotional purposes. It is highly recommended that you contact an attorney and draft a standard agreement that protects you.

At the time of signing the agreement, there are two other opportunities to enhance the process. First, get to know the bride and groom. Spend some time chatting so you will know their story and they will know you. When the wedding day comes, they should feel comfortable with you so their true personalities will shine. If possible, include a no cost or low cost engagement shoot so everyone can gain even more of a comfort level. It is a good opportunity to give them some posing tips that they can use on their wedding day

It is also imperative to know the schedule. When you are meeting with the bride and groom, go over the agenda for the time you are expected to be at the wedding. Get to know their expectations. Let them know when you expect them to devote time to photographs with you in charge. This is a good time to talk about a wedding coordinator. If they will designate a friend or family member that will help the you identify important family members during the wedding day, it can be a tremendous help.

WEDDING PHOTOGRAPHY TIPS FOR COUPLES

Introduction to wedding photography tips

Every time I meet with a couple for a conversation about their wedding photography I inevitably offer some suggestions that they could make during their preparations that will help me do my job more effectively. I have accumulated a wealth of experience over the years and enjoy sharing it with the couples that make time to discover my unique style of wedding photography. Several months ago, I realised that I am often repeating the same wedding photography tips from meeting to meeting and decided to formalise the suggestions in one central repository for easy reference and sharing. These wedding photography tips are by no means comprehensive, although that is my ultimate aim; they will be edited and improved upon as new ideas come to mind. Much like the wedding photography FAQ, you should consider this document a continuous work in progress.

The purpose of wedding photography tips for couples

The goal of this article is to help you help me deliver outstanding wedding photography by putting together an awesome, efficient, and beautiful wedding celebration.

As a documentary wedding photographer, I can only capture what I see unfolding before my eyes because my influence over the images is limited to angle, the field of view, focus, and timing. It is your duty to plan and design your wedding with the purpose of excellent images in mind, precisely because I do not rearrange trinkets, decorations, or furniture, or interrupt couples during touching moments with prompts to move here or stand over there. Despite that, I have no qualms about dispensing advice leading up to your wedding. The purpose of this article is not to make my job easier – in fact, I work harder when given more creative opportunities by thoughtful wedding planning – but to provide you with as much helpful information as possible so that you can help me deliver the best looking unposed photojournalistic wedding photography

Get your wedding photographer to capture you getting ready and preparing

Whenever I meet with couples whose fixed wedding photography budgets mean they have to decide between photographic coverage earlier in the day (preparations and getting ready) or later in the evening (once the dance party gets started), I always recommend they choose the former. There are many more touching and emotional moments happening at the beginning of the day than towards its conclusion. Once the dinner, speeches, and cake-cutting traditions are over, and the dancing (and drinking) has started, the utility of having a dedicated wedding photographer on site decreases dramatically. There are two main reasons for this. First, with a few rare exceptions, the schedule for this part of the night no longer has any earmarked events, traditions, or ceremonies to behold. The nighttime revelry rarely yields more than a handful or two of unique photographs, after which you quickly get diminishing returns.

Choose unique lodging

Couples that opt to have an overnight stay at a hotel on the eve of their wedding should consider upgrading their accommodations to lodgings with personality. Because conventional hotel rooms are designed to appeal to the greatest number of people, they strictly adhere to the same set of uninspiring interior design and layout tropes, and this bleeds into your photographs. Most couples understand the importance of selecting a unique venue for their reception, but often overlook the importance a distinctly beautiful location contributes to preparation photography.

Ultimate Guide to Wedding Photography

If you are interested in photography or even work in the photography business, then you have most probably stumbled across wedding photography already, since this genre is becoming more and more popular. I would say wedding photography is one of the most challenging fields in photography, because you literally have only one chance to get the shots that you want.

I have been photographing weddings for around 7 years now. Over the years, I have learned a lot – sometimes the hard way, through many mistakes. In this wedding photography tutorial, I’ll share with you some of my experiences, important advice and wedding photography tips to ensure that you’ll be well-prepared for the most important day in the life of the people you are going to photograph.

What is Wedding Photography?

So, let’s have a closer look at what your actual task is, if you are booked as a wedding photographer. Of course it’s about taking the best pictures possible of the whole day. This includes getting ready with the bride, the ceremony, a wedding shoot and the party.

While the wedding shoot is the only part of the wedding that you can actively control, the other parts are more like a reportage. Your job is to take pictures of what is happening in front of your lens, without interrupting anything. Nothing is worse than a photographer trying to get people to pose for the camera during a wedding. Always try to stay invisible and let people act naturally. Don’t make them feel watched. That’s how you’ll usually arrive at the best shots.

What Equipment do you Need to Photograph a Wedding?

There are no fixed rules for what camera gear you will need to bring to a wedding day but some parts of the equipment are obligatory, while others are more optional. First things first, let’s have a look at the most important things in your camera bag.

Guide To Starting Your Home Renovation Project

Don’t Be One of Those Homeowners Who Goes Over Budget on a Renovation

demolished her built-in bookshelves as part of a living room DIY, she found it gave the room some much-needed space. Unfortunately, she also found a hidden subfloor made from asbestos(!) tiles. She hadn’t budgeted for a new subfloor — or for the removal of a toxic substance. Yikes

Reconsider DIY

“If you don’t have the expertise, you could end up paying between 10% and 40% more,” says. Why? While your DIY labor is technically free, your lack of know-how can be costly.

And then there’s hiring and scheduling. A task like moving a wall could mean hiring an engineer and an architect, not to mention coordinating permits. A general contractor knows who’ll do the best work for the best price, and they’ll know when to schedule them to avoid wasting dollars on inefficient use of time.

Hire the Right Experts

If you decide to forgo the general-contractor route and hire individual workers yourself, it’s best to get at least three quotes for each service performed. Talking to professionals isn’t just about finding the most competitive price. It’s also an opportunity to figure out what services each individual contractor includes within his fee.

Map Out the Project Step by Step (So You Don’t Miss Anything)

So, you’re planning to put up a backsplash. What do you need to put into your budget? The tile and adhesive, right? And that’s about it?

Things to consider before starting your home renovation

When it comes to home renovations, there are two unassailable truths: It’s going to take longer than expected and it’s going to go over budget – sometimes way over. Oh, and given the number of nightmare stories out there, chances are you’re going to loathe your contractor. (They probably won’t be too thrilled with you, either, a lot of the times.) If you are thinking of undertaking a renovation this spring or summer, spare yourself the migraines and the moping and the complaining to friends about how awful it has all been. Get going now on the most important step of the process: proper planning.

THE TIME IT TAKES

The biggest mistake would-be renovators make? “Not doing enough homework up front,” he says. Even small renos, such as redoing a kitchen or bathroom, take 30 to 60 days of planning. That’s the time you will need to find a contractor, create a design and make more decisions than you can imagine. Meanwhile, you’ll have to decide how you want to use the space, visit stores to price materials and comb through design magazines for the look you want.

HOW TO PICK A CONTRACTOR

To find the right contractor, you need to do more than ask for a few references. “We’re all going to give you references, and we’re going to give you the best ones we’ve ever had,” says. For all you know, those references could be friends or family. “What you should do is go and look at one of the jobs [the contractor] is halfway through right now.” Talk to the client. Is the contractor reasonable to deal with? Is the job running on time? Has the contractor been going over budget?

recommends going to where contractors shop for their supplies and asking a few questions. Do the suppliers know the contractor? How often is he in buying materials? An electrician who has been purchasing thousands of dollars worth of material week in and week out for years is probably a lot more reputable that someone with a spotty shopping history.

HOW TO BE A GOOD CLIENT

There’s no shortage of complaints about bad contractors. But know this: Even the good ones are frustrated by clients sometimes too. “Whether you like it or not, I’m part of your family, and it’s going to be a love-hate relationship,”

Your Complete Guide to Home Renovation

In this guide, we will share the essential steps of home renovation and everything you need to know about making your dream home a reality. From finding your interior style to budgeting, furnishing, extra little tips from our own personal experiences and more, we got you covered

Choosing your interior style is a great way to kickstart your renovation journey. If you have no idea where to start, Pinterest is one of the perfect inspirational sites to go for! You can do a general search for popular home interior designs,

Sharing some inspiration, one of the increasingly popular options is the minimalist style. Going by the “less is more” approach, think clean, modern lines and simplicity, The lack of clutter is pleasing on the eyes and helps ease the mind

Now that you have settled on your home interior style, next up is determining how much it will cost to make your vision a reality. Factors that you need to consider when budgeting are:

Professional fees for interior designer or contractor

Size of home

Type of home (HDB, condominium, or landed house)

Type of furniture, appliances and materials

Moving costs

Buffer for extra charges or last-minute changes

To get a budget estimate of your home renovation project, you can start by using Qanvast’s useful renovation calculator, with costs based on $20m worth of past home renovation contracts. Either that, or the traditional approach of picking a sample style from your Pinterest board or anywhere online and send it along with a request for a quote from interior designers and contractors

Reasons to Renovate Your Home

Home renovations are costly, time-consuming and messy. Still, many people choose to renovate their homes for a variety of reasons. There are almost as many reasons to fix up your home as there are projects to choose from. Here are the top reasons for renovating your home.

To increase your comfort or enjoyment of the home.

This one comes first for a reason. Although there are many good reasons to renovate your home, your own comfort and enjoyment are important factors that shouldn’t be overlooked. If you renovate solely based on how it will impact the future sales price down the line, you may end up living in a showplace that doesn’t feel like a home. Your comfort and enjoyment are more important than what improvements will make the most money when you eventually sell.

To fix a safety issue.

Some home renovation projects just can’t be put off. Electrical problems, roof leaks, or a crack in the foundation are some problems that must be taken care of to keep your family safe and prevent catastrophic or total loss of the home.

To improve the home’s value.

If you plan to sell the home within the next few years, you may want to renovate some or all of it with an eye toward getting the most you can when you put it on the market. Some projects that have the best immediate return are opening up the main living space, replacing the front door, and updating the kitchen or bathroom

To upgrade the home’s function.

Maybe you need more space, or a second bathroom would make things a lot easier during those busy mornings. Maybe your husband wants a man cave, or you would like a deck or a patio for outdoor entertaining. Renovating so that the home functions better for the residents is a good idea, as long as the upgrades don’t hurt the home’s value or decrease usable space.

Things You Need to (NOT) Do For Your Next Home Improvement Project

Yet, there are still very real pains homeowners feel in the midst of a home improvement project. If it looks so easy on TV, how can remodeling be so difficult in real life? Sure, those snapshots of the before and after paint a beautiful picture, but what you don’t see is the all of the time and stress involved. Not to mention the real-life aggravation of living months without a functional kitchen.

Don’t Wind Up In Project Purgatory

The home improvement journey is a wild ride that has the potential to produce some truly stunning results, but it is easy for projects to stall or take an unexpected turn for the worse. So, don’t start without a plan, and coincidentally, don’t expect everything will go according to plan.

Don’t Think You Can Do It All Yourself

But, “I don’t need any help.” Yes you do. Even if you’re an ardent do-it-yourselfer, it is wise to consult an expert prior to demo day. When hiring professionals, do your due diligence in research. It’s great you’re asking for help, but make sure you find GOOD help. Dive into whether they have ample experience, are licensed, and have past client references. But just because they’re a good architect, interior designer or general contractor, doesn’t mean they’re right for you. To choose the best person for your project, also consider if they are paying attention to what you say. Are they asking the right questions? Do they seem curious about your needs, wants and the way you live?

Don’t Try to Tackle The Unknown

“You don’t need a professional for that.” Whatever you do, don’t believe this lie. Sure, you can take on painting your living room, but when it comes to structural changes, electrical, plumbing, roofing and windows, leave it to the pros. It isn’t uncommon to discover structural problems as you tear down walls, replace cabinetry, or re-tile a floor, especially in older buildings (but new construction doesn’t guarantee smooth sailing either). This can make your ‘weekend project’ a ‘whole life project’.

Don’t Be Cheap or Lavish. Be Smart With Your Renovation Budget

While it can be easy to want to go all out and spare no expense when remodeling or building a new space, price tags do matter. Quality is certainly crucial, so by no means should you settle for shoddy materials over trusted brands, but you want to keep the big picture of your project in full view. This includes long term maintenance, energy loss, and repairs. Those expenses add up quickly, so consider them in your plan when comparing prices.

The Pros And Cons Of Studying Forensic Accountant

How Much Does an Accountant Cost for Small Businesses? A Helpful Guide

Picture yourself working in your dream office, running the business you wanted to start years ago. Now, you’re finally successful, but you have a problem. You don’t have time to grow your business since you have to do all of the accounting work. So you ask yourself, how much does an accountant cost?

How Much Does an Accountant Cost?

If you’re looking to work with an accountant in your small business, you should consider the cost. An accountant is an essential part of running a successful business. However, small business accountant fees can be expensive. It’s worth looking at the question, how much does an accountant cost?

What Affects Small Business Accountant Fees?

Since many accountants price their service by the hour, time is the most obvious factor. A business that requires 10 hours of help will have to pay more than a business that only needs an hour. However, time isn’t the only factor to consider. Depending on the accountant or accounting firm you choose, the accounting fee can vary.

Experience

The first thing that can affect small business accountant fees is the experience level of the accountant. Of course, a newer accountant won’t charge as much as one with experience. In some cases, you can save money by working with a newer accountant. However, you will risk not getting the best services.

Services Needed

Regardless of the experience of your accountant, the services you need can affect the accountant fee. In some cases, you may need help with bookkeeping. However, you might need more accounting services that cover bookkeeping, taxes, and financial advice.

How to Prepare for an Accounting Interview

Accounting is a fast-growing field, and competition is stiff as both college graduates and experienced professionals apply to in-demand jobs. Your resume will get you in the door with a prospective employer, but it’s the interview that sets one qualified applicant apart from the next. If you’ve landed an accounting interview for your dream job

Know Your “Why”

Why do you want to be an accountant? It’s one of the first questions most interviewers ask, and your answer can set the tone for the rest of the interview. Prepare your answer beforehand and be ready to expand on the hobbies, interests and goals that led you to pursue accounting as a career. You don’t need to wax poetic about a lifelong love of numbers, but interviewers want to understand what interests you about the job beyond the paycheck.

Brush Up On the Basics

A few basic accounting interview questions include:

What are the differences between accounts payable and accounts receivable?

What are a couple of ways to estimate bad debt?

How can you minimize and check for errors in your work?

An interviewer may ask these fundamental accounting questions  to test your knowledge. Even if you know the material forward and backward, prepare verbal answers ahead of time.

Plan Stories

Almost every interviewee will need to tell a story about a time they solved a technical problem or dealt with a disgruntled client. These questions are designed to assess your communication, attention to detail, calm under pressure and other transferable skills. Have a few stories ready so you don’t have to maintain an awkward silence as you think.

Arrive Early

Arriving early is a must for any interview, and accounting is no exception. In this decidedly type-A field, you’re expected to demonstrate meticulous precision and attention to detail, and the accuracy of your work can significantly impact a company’s bottom line. Showing up late demonstrates exactly the opposite, so be there ahead of time.

Helpful and Knowledgeable Accountants

“I would rate Inca as the best accountant that I’ve had”

I like the fact that Inca are approachable, always helpful, and knowledgeable. If I want to know a fact, Graham can answer any questions. have helped considerably with their advice, and they’ve tried to give me pointers on how to improve areas of my business, which is quite difficult in a way for them to do as it’s quite a niche business, but nevertheless they’ve tried, and some of the things have been quite helpful.

accountants for new businesses

Whether you’ve started new businesses before, or this is your first venture, you’ll know that this is an exciting, and a little uncertain, time. As a local, approachable, plain-speaking accounting service, we’ll help to ensure your new business has the best start with solid financial and business advice.

You’re more likely to succeed with accountants

It’s difficult when you’re on your own, or there’s only a few of you. That’s why making the right choice of accountant for your new business makes such a difference.

You may know that in the UK only 20% of new businesses make it to their 5th birthday. recently conducted a survey of new start-up businesses who engaged with between 2009 and 2011. 57% of them are still trading – that’s 185% better than the statistical market average.

Advice on the best tax structure

ensure you have all your financial affairs in order from the start and have the most efficient tax structure that will maximise your income. recommend that you’ll set up as a sole trader, limited company or a partnership.

Fixed fees quoted up front

There’ll be no nasty surprises and there are flexible payment options to help you manage your cashflow.

How to become an accountant

If you’ve strong numeracy skills, an analytical mind and are good at managing money, discover all you need to know about becoming an accountant

Accounting is often perceived as an uneventful career by those outside of the industry, but it can actually be one of the most fulfilling – whether you choose to work in the private or public sector

Study the right accounting qualifications

The AAT qualification is typically the minimum level expected of an accountant, but to ultimately become a chartered accountant, you’ll have to progress to the ACCA, ACA or CIMA qualifications.

To give you a good starting point, the most popular accountant qualifications include:

AAT (Association of Accounting Technicians) accounting courses – made up of three qualifications across three levels, they combine industry knowledge and practical work skills.

ACCA (Association of Chartered Certified Accountants) qualifications – they comprise of two levels: Fundamentals and Professionals. The modules cover a variety of topics from corporate and business law to audit and assurance.

ICAEW (Institute of Chartered Accountants in England and Wales) chartered accountant status – also referred to as the ACA, this qualification consists of three to five years of practical work experience and the completion of 13 modules.

CIMA (Chartered Institute of Management Accountants) business finance award – oversees the widely-recognised CGMA (Chartered Global Management Accountant), which requires you to have already gained the postgraduate-level Certificate in Business Accounting.

Many accountancy firms will accept qualifications from any board, but if you have a definite career path in mind, it’s worth taking a look into the preferred qualifications of that specialism.

For example, if you’re interested in becoming a chartered accountant, you’ll need to have studied for the ACCA qualification and have three years’ work experience in a relevant role. It usually takes around four years in total to become fully qualified.

Don’t waste your money and time on Accounting

Persistence is the difference between those who succeed and those who don’t.  You have got the intelligence and the knowledge.  Keep putting your best forward and I believe that God will reward you

has a different job market than the States. Community colleges have relevant coursework. However, the job market is skewed to discriminate against women. We’re usially the last ones hired and the lowest paid

(1 semester) is simply a prerequisite to your accounting assistant certificate (2 semesters, 1 which is already done cause of the prerequisite) and that is the prereq to getting your associates in applied science accounting (2 years, 1 year which is already completed cause of your prereq’s). So no, they’re not really helpful finding a job. They’re very much helpful in gaining your AAS accounting degree tho.

I have done a certificate 3 in business administration.I have no experience. I have 5 year experience in teaching .i changed my career. how to get a job entry level in payroll

I’m late lol, but I’m having the same problem. I couldn’t even get an internship. I have a degree in finance and currently work as a central cashier in our accounting office. I’m thinking of getting quickbooks knowledge and a bookeeping certification.

Auto Repair Today

Auto Repair Shop

understand that in these trying times that the last thing you want to have happen is a costly repair. That is why make sure that your vehicle is in tip-top shape and that you are informed of everything that is going on with your vehicle and that you have a solid game plan as to how to address the issues in a matter of importance. call this repair blueprint. It allows you to fix the immediate concerns and decide in the future what to fix as money and time allows.

long list of services includes oil changes, engine rebuilds, battery replacements, tire sales, inspections, suspension service, transmission repairs and much more. goal is to get you back on the road quickly and keep your car running safely for as long as possible.  work on all makes and models of automobiles.

letting you know if there are any critical issues and helping you prioritize anything that may need attention

Automotive Service & Repair Shop

It’s pretty simple, are the experts when it comes to maintaining and repairing your car but it really isn’t just about cars. It’s about commitment to community, friends, & neighbors

Automotive really is a different experience from what’s typical in the auto repair business. choose to “pull back the curtain.” and involve our customers in the repair and maintenance process of their vehicles.

auto’s approach is to look at your whole car with you in mind. We provide you with the honest answers and the complete information you need to make the best choices for you, your car and your wallet.

Little things matter to like vacuuming your car’s floorboard and washing the windshield when return your vehicle to you. After your visit we’re going to follow up with you to make sure you were satisfied with your visit

The quality of repairs and parts offer allows to cover you with one of the best warranties around, *2yr 50k miles. The icing on the cake is most services at our shop qualify you for coverage in a Roadside Assistance Club

Tax Guide for Auto Repair Garages

recognize that understanding tax issues related to your industry can be time-consuming and complicated, and want to help you get the information you need so that you can focus on starting and growing your business. To help you better understand the tax obligations for your auto repair garage, we have created this guide.

How to Use This Guide

Each section of this guide contains information important to your business. The Getting Started section provides key resources related to registration, filing returns, account maintenance and other important information you need.

The Industry Topics section and the Specialty Repairs or Services section covers many topics in an at-a-glance format that can be expanded to provide more extensive information if you need it.

Lastly, the Resources section provides links to a wealth of information, including web-based seminars, forms and publications, statutory and regulatory information, and access to live help from our customer service representatives.

If You Need Help

If at any time you need assistance with topics included in this guide – or with others may have not included – feel free to contact by telephone or email for assistance. Contact information and hours of operation are available in the Resources section

AUTO REPAIR

are expert mechanics. rebuild transmissions in-house and provide expert clutch repair. are conveniently located in central for your service and maintenance needs and are qualified to repair and service all domestic and imported cars, trucks and SUV’s using parts that are equal to or exceed the standards of those parts originally used by the manufactures. are definitely the cost-effective alternative to car dealerships.

provide service for all scheduled maintenance of your personal or company auto, pickup or truck. Regardless of where it was built, will service your vehicle and still maintain the manufacturer’s warranty.

Auto Repair is independently owned and operated. pride ourselves on getting the services or repairs on your car, truck or SUV right the first time by highly qualified service technicians. So drop your auto, SUV, or truck off today and allow to provide you with excellent service.

AFFORDABLE VEHICLE REPAIRS

SERVICE

Tens of thousands of people from the greater area trust Good News Auto. are a full service mechanic shop that uses it’s profits in a very unique way, dont keep them

TRUST

know that industry has not instilled trust over the years. That’s part of the reason why Good News Auto exists. wanted to bring back a level of service that people could come to depend on again.

PROFITS?

operate business in a weird kinda way. In all the business training out there, the focus is making a profit so you can retire.

Standard Maintenance Services

Factory Scheduled Maintenance

30/60/90/120 Km Services

Vehicle Inspection & Repairs

Computer Diagnostics

Oil Changes

Tune Ups

Filter Replacements

Safety & Insurance Inspections

Windshield Wiper Blades

Fluid Services

Trip Inspections

Maintenance Inspections

Check Engine Light Diagnostics & Repair

Brake Repair & Antilock Braking System (ABS) Repair

Shocks & Struts Repair

Chassis & Suspension Repair

Suspension & Steering Repair

Engine Services

Engine Repair

Engine Replacement

Engine Performance Check

Belt Replacement

Hose Replacement

Cooling System Repair

Radiator Repair & Replacement

Water Pump Repair & Replacement

Drivability Diagnostics & Repair

Fuel Injection Repair & Service

Fuel System Repair & Maintenance

Ignition System Repair & Maintenance

Water Testing Methods: Measuring Conductivity Levels In Fluids

Pool Water Testing

Safe, healthy water. It’s what we all want most when it comes to our pools and spas.

Regularly testing your water is an essential part of maintaining your pool’s welfare. Getting an accurate reading of your water chemistry helps you understand exactly how much of what product your pool needs. Testing your pool water prevents the possibility of under-treating or over-treating the water, which keeps your pool properly balanced and saves you money!

Let’s go over a few of the basics when it comes to properly testing your pool’s water. There are two ways to test your pool water — at home or in-store.

At-Home Pool Water Testing

Leslie’s offers several options you can use at home, including test kits and test strips. Testing at home is easy, but there are a few things you need to know before getting started. Which type of test will work best for you? Let’s take a quick look at the pros and cons of each:

Liquid Test Kits

PROS

  • Most accurate type of water test. Liquid DPD reagents are the best for testing chlorine levels in your pool
  • Testing available for more diverse aspects of water chemistry
  • This method is used by pool professionals and health departments

CONS

  • Most expensive water test
  • Testing process can take longer and be more complicated than test strips
  • Reagent bottles must be held vertically to ensure uniform drop size, and drops must be counted as they’re slowly added
  • More prone to user-error

Test Strips

PROS

  • Fastest water test
  • Simple to use and read
  • Least expensive to purchase
  • Most popular option for pool owners wanting a quick, daily pool chemistry analysis

CONS

  • Fewer options for testing capabilities
  • Not as accurate or precise as a liquid test kit
  • Some results take just a few seconds to develop, and some take longer; for tests with multiple results on the same strip, it’s important to understand the timing so you don’t get inaccurate results
  • Hands must be completely dry when removing the strip from the container

Special Tests

Standard test kits will accurately test for the four or five principal tests most homeowners need. There are also specialty tests that can be conducted in certain circumstances:

  • Biguanide water treatment systems, found on some swimming pools, require biguanide test strips to check the sanitizer levels, pool pH, alkalinity, and calcium hardness levels.
  • Test for salt on saltwater pools using a salt test strip. if you use a salt-chlorine generator, you will also need to test for chlorine.
  • Phosphates can be tested using a phosphate test kit. Phosphate can enter a pool from a variety of sources, such as lawn fertilizers, and they can lead to algae that feed on the phosphates.
  • If pool water stains the surface of your pool, you can test for metals such as copper or iron using special test strips designed for the purpose.
  • Chloramines (combined chlorine) can be tested with a DPD test kit. ShockCheck test strips can tell you when shocking is needed to remove chloramine.
  • TDS (total dissolved solids) can be tested with a SafeDip test meter.

Why Testing Your Pool Water Is Important

Your pool, while it looks like a pond, is more of a chemistry lab. The chemicals in your pool can either keep it clean or make it potentially dangerous. Testing your water is the only way to know for sure what those invisible chemicals are doing in your water.

You need to test your water often. While it might seem like a hassle, it’s a good thing! The better balanced your water, the less cleaning and water changing.

When and How Often to Test Your Pool

You can test pool water yourself, but if you don’t feel super comfortable doing that, you can also take a sample in for professional testing when you open and close your pool. A second set of eyes keeps it safe and clean. On the whole, you should be testing your pool at least once a month in addition to when you open and close it for the season.

Regular testing is essential for your chlorine, alkalinity, and pH levels. It’s so significant, the CDC calls chlorine and pH your “disinfecting team.” The minimum testing schedule for pH and chlorine is weekly, starting before you open your pool.

There are other times that you should test for balanced levels though, including:

  • After a rainstorm
  • After large groups have used the pool
  • Before beginning any form of algae treatment (pH testing is mandatory here)
  • After changes in the weather
  • After adding water
  • Before you close your pool
  • If you notice any issues with your water, like cloudiness or color changes

Pool-water chemical levels to test and balance

The four chemical levels critical to healthy water are free chlorine, calcium hardness, pH, and total alkalinity. Along with cyanuric acid (a type of water conditioner sometimes referred to as “sunblock for pool water”), these compounds work in unison, and having each at the right level helps deliver sparkling, swim-ready water.

If water analysis indicates that one or more chemical levels are too high or too low, the message is to take action. With the water readings, you will know to add products like chlorine, muriatic acid, sodium bicarbonate, or other pool treatments.

Sources of contamination in swimming pools

Potential sources of microbes in your pool may include:

  • People swimming in the pool – this is the main source of microbes.
  • Animals, such as dogs – some pets like to paddle in the pool on hot days.
  • Dead wildlife – for example, frogs, lizards or insects may occasionally drown in your pool.
  • Debris from around the property, such as leaves, grass and dust.

Why You Should Hire Wasps Control Services

How NOT to remove a wasp nest

There are many sources online advising on the best DIY methods to remove a wasp nest. Wasps are aggressive creatures and require little to no aggravation to attack, so trying to remove a wasp nest yourself can cost you both financially and physically.

DIY wasp nest removal is Not advised!

1. Burning a wasp nest

Using fire to remove a wasp nest is a very dangerous task and is not a successful way to eradicate the wasps.

Wasp nests are made from a thin papery substance produced by chewing wood into a pulp, making it extremely flammable. Because of this, burning a wasp nest can often lead to not only your property catching fire, but also you suffering painful burns.

Another problem with burning a wasp nest is that it is not an effective way to control a wasp problem. This is because it doesn’t kill all the wasps. It can lead to the remaining wasps in the nest becoming violent, as well as the wasps out foraging for food, resulting in them attacking you and any bystanders.

2. Water

Using water is often regarded as another way to get rid of a wasp nest. The truth is that flooding a wasps nest isn’t an effective method at all. This is because:

Depending on the location of the nest, using water to remove a wasp nest can result in further damages to your property. For example, if the wasp nest is your attic, trying to remove a wasp nest by flooding it could cause water damage to your attic beams and ceiling plaster boards.

Trying to flood a nest won’t get rid of all the wasps inhabiting the hive either. Similar to the effects of trying to burn a wasp nest, the wasps will become vicious and begin to attack, leaving you with a handful of painful stings.

3. Destroying a wasp nest with a baseball bat

Destroying a wasp nest with a bat, racket or any other item is another talked about removal option. To be honest, this is the least intelligent idea for removing a wasp nest yourself.

Trying to remove a wasp nest by destroying it with a baseball bat will put you at direct risk of getting stung, not only once but multiple times. This can be particularly dangerous if you are allergic to wasp stings as you could go into anaphylactic shock.

This method of DIY wasp nest removal puts you in close proximity to the hive, which is often enough aggravate them to trigger an attack. Trying to remove a wasp nest using a baseball bat can often result in being stung before the task has started.

How to get rid of a wasp nest without getting stung

If you have professional experience with disposing of active wasp nests, you may use one or more of the following methods. If not, the Fantastic Services team recommends that you leave this job to the professionals.

  • With pesticide spray. You can purchase a wasp killing pesticide from your local supermarket. Follow the instructions on the can. The most common practice is to spray the pesticide in the opening of the nest for about 20 seconds. That is all. If the nest is active on the next day, repeat the process. Once all wasps are dead, you can knock down the nest.
  • With insecticidal dust. If you’re dealing with a ground nest, insecticidal dust can prove useful. Just apply the dust on the nest liberally and then, vacate the area. Give it up to two days to work. If the nest is still active, repeat the process.
  • With smoke. If you have a nest on a tree branch or somewhere away from your house, you can also try lighting a fire under it. The smoke will rise and suffocate the wasps, forcing them to leave it. Once they’re gone, you can knock down the nest.
  • By dunking the nest in water. This one is effective but dangerous, and it’s only useful for aerial nests. First, place a bucket of water under the wasp nest. Then, carefully put the entire nest into a cloth bag. Make sure the bag has no holes or tears. Then, tightly secure the top of the bag with a firm string. Now, you can safely cut the nest from the branch and then, dunk it in the bucket. Place something heavy on top of the bucket and leave it overnight. The wasps should be dead by morning.

How long do wasps live?

Wasps are one of the most common stinging insects that pop up around spring and the summer time each year. These pesky bugs can cause a lot of pain, both physically and mentally for homeowners. So, how long do wasps live?

The lifecycle of a wasp depends on the species, but in general a worker wasps life can last from 12-22 days, while a queen can live up to a year. There are many different types of wasps in North America, paper wasps and yellowjackets being the two most common.

Paper wasp lifecycle

When the queens are fertilized, they spend their winters in sheltered areas like underneath tree barks, or crevices found in homes or other buildings. The queen then selects their nesting area and builds it in the spring.

The eggs are laid down and then hatched into larvae. Paper wasp larvae will develop in stages before becoming an adult. Workers will help build the nest, feed the young, and protect the nest. When a paper wasp nest matures it can hold anywhere between 20-30 adults. The queen will stop laying eggs in the late summer and shortly after the colony will die off; which will make it around 3-4 months for workers and 10-12 months for queens.

Yellowjacket wasp lifecycle

Yellowjackets or Vespula vulgaris are also social insects, and are able to build their nests the size of a basketball. Yellowjackets share similar nesting habits to paper wasps, where the queen will find shelter in the winter and seek a nest in the spring.

However, because of the queen’s ability to store sperm, the queen is able to lay eggs throughout the summer, and will run out at the end of the season. Which makes the lifecycle of this type of queen wasp, anywhere from 10-12 months.

Wasps can die of loneliness

Wasps are very social creatures and will build many colonies based off how well they mate. Since the purpose of a wasps life is to mate and/or create offspring, unmated wasps will eventually die off. Any unmated wasp, male or female, will perish around late summer to early fall.

How to prevent a wasp nest

Being a wasp preventer is always a better choice than being a wasp killer, and there are a number of precautions you can take to stop wasps from building nests in your property:

  • Shut your bins: Leaving bins open will attract wasps that are looking for some easy food. To keep wasps out of your bins always make sure the lid is put on properly and keep your bins away from the building if possible.
  • Protect windows and doors: One of the easiest ways to prevent a wasp nest is to keep wasps out of your home. Keep your doors and windows shut where possible, or install fly screens to stop insects getting in while still keeping the property cool during hot weather.
  • Search for wasp nests: When it comes to springtime, it is worthwhile checking any spots that are likely to house a wasp nest. If you check for these during the spring, then the wasp nest will be small, and wasp nest removal will be simple. At this time of year, they will be around the size of a golf ball.

Does the old queen die off?

A queen wasp survives for one year only. She is hatched in the autumn along with around 1500 of her sisters then once mated she hibernates through the winter months then emerges in the spring ready to build a brand new nest. Only a small proportion of hibernating queens survive winter.

Once she has started the nest and hatched a few worker wasps, she spends the rest of her life in the nest as an egg-laying machine. In late summer/early autumn as the nest comes to the end of its natural life, the queen lays special eggs which once again are new queens for the next year.

Do wasps return to the same site?

Wasps do not generally return to the same place year after year. However, some roofs are favoured for their position and habitat. Some people say to us “we get a wasp nest every year”. If you appear to get a wasp nest every year, take a look at your roof, is it exposed to the sun all day? Wasps love warm locations.

Does your roof have plenty of gaps for wasps to gain entry?

Is there plenty of old wood available near your home (fence panels, garden sheds) for the wasps to use as a nest-building material? Food supply and local water supply will also be a factor.

Office Moves To A Remote Location

THINGS TO CONSIDER BEFORE HIRING OFFICE MOVERS

Is your office looking to make a big move this year? If so, there’s a lot of planning that you need to do to get your team ready. One of the biggest things you need to do is to hire an office moving company. But, with plenty of moving companies out there, which one should you choose? Make the right choice, and you’ll have a smooth and easy move that brings minimal disruption to your business. But, choose the wrong company, and you could easily have a disaster on your hands. Don’t worry, we’re here to make the decision an easy one. Check out this guide to learn the top things to consider before hiring office movers.

Get Recommendations from Those You Trust

Before hiring office movers, you should first talk to those you trust for recommendations. Considering that 40 million people, or 14 percent of the population, move each year, there’s a good chance that you have someone in your life that you can trust for a recommendation.  It’s possible that someone you know had a bad experience with a reputable company. On the other hand, it’s possible someone had an excellent experience with a relatively new company. While Google can certainly be reliable for finding a moving company, asking for recommendations from those you trust can help you read between the lines.

License and Insurance

Before hiring an office moving company, you also want to look into their license and insurance. Never, under any circumstance, should you use a moving company that isn’t licensed and insured. If you are relocating your office within the state, then it’s important to note that each state has different rules and regulations when it comes to licensing, so it’s important to look into your own state’s information. Insurance is also extremely important for a moving company, as without insurance, you could end up footing the bill for a mover who gets hurt on the job.

Experience

Obviously, you want to make sure the moving company you hire has a few years of experience under their belt. However, you also want to make sure that the company you hire has experience in your specific type of move. Moving from one house to another is a lot different than moving from one high-rise office to the next. Therefore, you need to make sure you hire a company that has experience with office moving. Only an office moving company will know the ins and outs of moving fragile office equipment, finding parking in busy downtown areas, and fitting heavy office furniture in elevators and up staircases.

Review the Estimate Carefully

Last but not least, you want to make sure you review the estimate the moving company gives you carefully. Make sure you cross those T’s and dot the I’s, and read all of the fine print. If you get a super cheap rate from a moving company, it may be tempting to immediately say yes. But, you often get what you pay for, so tread lightly. Before you sign, make sure the company you hire is transparent about all of their charges.

Items to Include on Your Complete Office Moving Checklist

For businesses, moving office locations can be a stressful and tedious process. The move must go as smoothly as possible. The more issues that pop up, the longer it will take to get up and running at the new space. Preparation is one of the best ways to avoid hold-ups and ensure everything is accounted for. Creating an office moving checklist is a must for business owners and managers.

Office Furniture

There’s a good chance the furniture in your office will account for the most bulk during your move. You’ll need to make some decisions before moving day. Take a careful inventory of all your office furniture and determine which items you should get rid of. There’s no point in moving useless furniture to the new space.

Tech Equipment

Things like computers and modems require extra care during an office move. You need to have these items labeled and appropriately packed. Most of these devices also include hardware, cords, and other accessories. Make sure you account for everything during the packing process.

Important Documents

Even in today’s digital business environment, most offices contain sensitive documents. These could include client contracts, employee records, and trademarked business information. You must treat these documents with care. You’ll need to remove them from file cabinets and securely transport them to the new space.

General Office Equipment

Go through your office and write down all the pieces of general equipment involved in the move. This includes printers, fax machines, telephones, and office supplies. This is another situation where you should consider the condition of the item. A piece of equipment that’s outdated might not be worth moving to the new space.

Moving Office Tips for Employees

Moving office takes time, luckily, it is a burden that everyone in the company shares equally. With the right planning, organisation and coordination, a lot can be achieved with as little effort invested as possible. The work must carry on at the new workplace location, so having everyone exhausted by the move may result in turnover you don’t need. Therefore, everyone must play their part in this process. Here is our office moving checklist for employees.

Tell all your clients

The first thing you need to keep in mind is that this move isn’t just affecting you. For instance, what happens in a situation where an important client decides to visit you, unannounced, at your old location, only to find you absent. In this case, they might get the impression that they are not important enough to get a timely notification of your company’s relocation. To avoid this, contact your clients in advance and let them know you’re moving office, including the new office address, change of operating hours and telephone number (if any).

Make an announcement

When a company relocates, there are so many things to do. Most importantly, your workforce needs to make an important choice whether they will relocate with your business or quit. In a situation where the move is across the country, it isn’t that odd to assume that some staff may decide to leave, yet this is something that needs to be discussed in time.  It is vital that the employee responsible for spreading this announcement (most commonly someone from HR) does this to give employees enough time to work their notice period and recruit for new staff. This usually means weeks or even months in advance.

Hire office movers

As for the move itself, contacting professional office movers in advance to avoid the hustle. The office manager is recommended to have the full list of the items, including computers, furniture and storage, that are transported to a target location. It may be more cost effective to purchase new office furniture and equipment at the new location than to pay for the relocation of goods from your existing office. You can either sell these items or donate them to a charitable organisation. It is recommended to get an itemised quote from the office movers to work out what is the best course of action for you.

Get the packaging material

Simply contacting office movers isn’t enough, it is also your job to secure all the materials that you’re going to take to your target location. For this, you need to get a sufficient amount of boxes, duct tape, labels and other important items. It is important that you are as organised as possible during this process.  It is common for many items to get misplaced and mishandled during the move as people don’t know the importance of the contents of the box. For this reason alone, some companies purchase, borrow or rent out a label printer.

Things to Think About Before Moving Office

If you’re running your own business, it’s highly likely that at some point you’ll be faced with the decision to move offices. You may be a solo operator looking to branch out beyond your home office, maybe you’re exploring new geographic markets, or perhaps you’re expanding a small team and simply need more space. It’s inevitable that your business needs or operations will change over time and the office space you’re in, may simply not always be able to support them.

Location, Location, Location

Just like moving home, selecting the right location for your new office requires careful consideration. Take some time to think about your customers or clients and other stakeholders, as well as your staff.

Technology

The technological infrastructure is an important element that you’ll need to factor in, which largely depends on what your business needs. Things to consider include:

Power

Heating & cooling

Communication services

Wireless connectivity

Phone/computer systems & cabling

Security

How Much Space Do You Need?

Moving office is a good time to take a look at the type of business you are running and what type of space will best support it. Will you be there from 9-5 each day, or do you spend a significant amount of time visiting customers? What about weekends? Do your employees need a traditional workstation (desk/chair/computer), or does it need to be a more flexible set-up? Your specific business and the type of work that you do will dictate the type of work space need, so consider this carefully.

What About Furnishings?

New furnishings are often a necessity when moving into a new office. If the new layout is significantly different, there’s a chance any current furniture you have won’t fit into the new space. On the other hand, if you’re moving into a bigger space, more furnishings will be a necessity.

How to Pack your Desk for an Office Move

Whether you are moving to a new desk or to a completely new office, packing your desk can be a bit of a hassle, especially when the bulk of packing is done during the work day. It is important to plan out your packing process and make sure all your important items are secured properly. Below you will find some helpful tips on how to pack your desk, so you will be ready for the big move!

Declutter your workspace– A desk tends to become a catch-all for paperwork, pens, cups, food wrappers, etc. It is important to get rid of all trash or unnecessary items you may no longer need. You can easily determine what should be thrown away by simply asking yourself, “Have I used this in the last 6 months?” If the answer is no, then toss it! Decluttering your workspace will make the packing process much easier.

Pack paperwork– Paperwork and files are most likely going to be the bulk of what needs to be packed and organized before your move. Be sure to collect all your important paperwork and organize it with file folders. Don’t forget to label the folders, so you can determine which paperwork is in each file. Less important paperwork can be scanned and transferred to a flash drive or a disk to save space. Once all your important documents have been organized in file folders, place them into a box and label the box, so it can be easily located upon arrival

Pack smaller items– Smaller items on your desk such as pens, pencils, rulers, staplers, tape, scissors, can take up a lot of space when packing. It is important to stay organized and keep like items together. Pens, pencils, highlighters, etc. can be consolidated into one small box or a pencil case. Slightly larger items like rulers, staplers, and tape can be put into a gallon-sized Ziplock bag. All liquids such as hand sanitizer, lotion, white out, etc. should be packed separately in their own box or bag to prevent spills. Any food items can be placed into a grocery bag separate from all office supplies.

Disconnect electronics– If your company is not providing technical disconnect and reconnect services, it is important to disconnect all your electronic devices such as computers, phones, and printers; so they are ready for relocation.