Get Rid Of Bed Bugs Naturally For A Pest Free Home

How To Choose A Pest Control Company

According to Andy Architect of the National Pest Management Association, there are more that 19,000 pest management firms operating in the United States. Unfortunately, these companies are not all created equally.

Here are some steps from entomologist, Jeff White, to narrow your options and find the best:

Use web and telephone directories to locate several pest management firms in your area. Some may designate themselves as bed bug specialists, but this designation should only be an indicator and not a deciding factor.

Only utilize companies that have been registered to apply pesticides by the pesticide regulatory agency in your state. Lacking this license should serve as an immediate red flag.

Search for companies that use integrated pest management (IPM) services. IPM is a form of pest management designed to minimize the use of pesticides. Companies that utilize an IPM approach are more likely to provide ongoing monitoring and a multidisciplinary approach to bed bug management (more on this later).

INTERVIEWING COMPANIES: QUESTIONS YOU SHOULD KNOW TO ASK

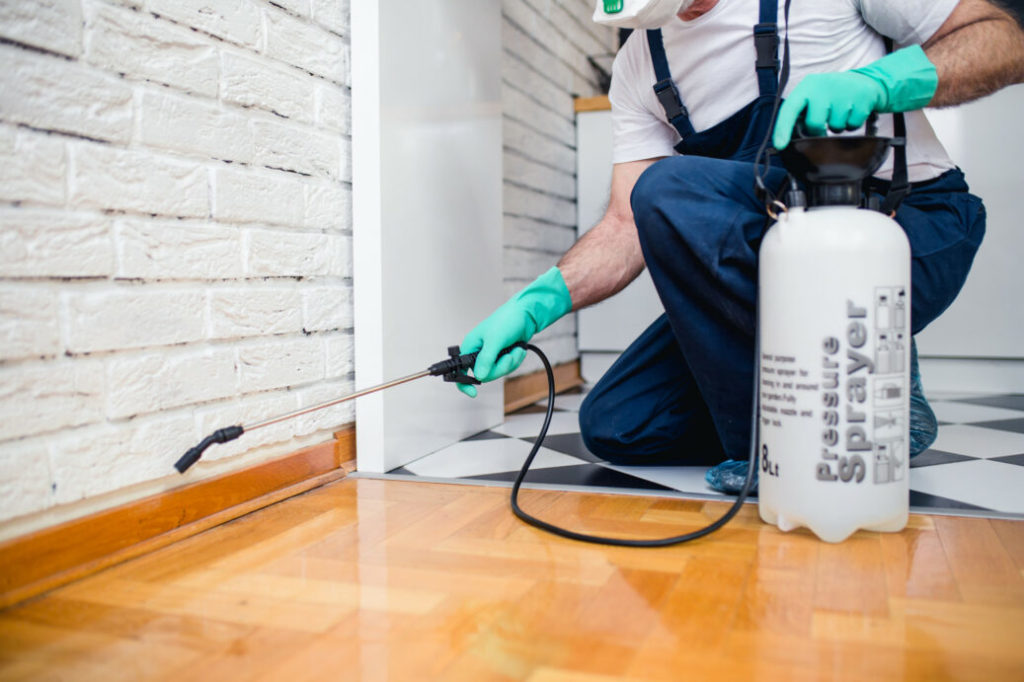
Once you hire a pest management firm they may be entering your home and spraying pesticides or performing services that can cost hundreds of dollars. Interviewing the selected companies is not only your right, it is strongly advised.

Some key associations to look for include:

The National Pest Management Association (NPMA), state pest management associations, QualityPro, the Better Business Bureau (BBB), and bedbugFREE. Companies may also be members of equivalent associations.

Membership with the bedbugFREE national network is a particularly important affiliation to consider when bed bug treatments are desired. This membership indicates that companies are not only members of NPMA and/or QualityPro, but have also had their bed bug treatment protocols evaluated to ensure they share multidisciplinary treatment methods and philosophies similar to Bed Bug Central’s protocol.

Ask companies about their integrated pest management (IPM) approach to bed bug treatments. A good company should utilize some, if not all, of these procedures:

Use of a multidisciplinary approach beyond pesticides such as: vacuuming, cleaning, steaming, using mattress encasements instead of treating beds with pesticides, heat or Cryonite treatments, and/or fumigation.

Insist on inspecting before quoting a final price.

Price jobs according to findings and not just a flat fee.

Educate you on bed bugs, the company’s inspection findings, what they will be doing, and prevention.

Provide a written inspection report and a strategy for services rendered.

Provide a thorough follow up program that is not based upon a minimum number of visits but rather is based upon the current status of the bed bug activity. Follow ups should continue until control or elimination is achieved.

Inquire if children or pets are present and adjust their treatment protocol and use of pesticides accordingly.

Have a well-defined methodology for determining when an infestation has been eliminated.

Work with property managers to notify adjacent apartments about the problem and recommend including surrounding units for inspections and treatments.

How To Get Rid of Bed Bugs

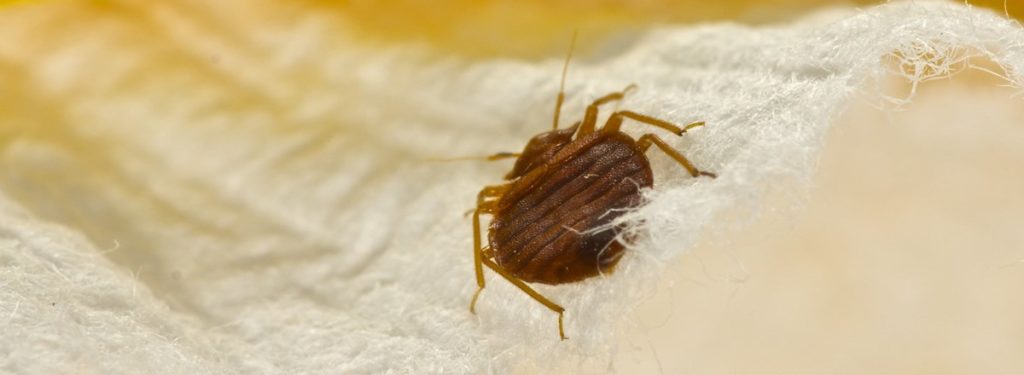
Bed bugs infestation can spread easily and it’s very difficult to treat especially when a Cimex Lectularius infestation increases in epidemic proportions, as they thrive in any weather and environment. The key to eradicating bed bugs is early detection and quick treatment by an expert pest controller.

Identify Your Pest

Bed bugs hiding in the tiniest creak and crevice makes it a challenge to spot these flat and brown crawling bloodsuckers. Sometimes, bed bugs have been mistaken as cockroach nymphs or even beetles.

Choose Your Method

DIY or Professional?

When it comes to getting rid of bed bugs, you have two basic options: DIY or hire a professional. The DIY option typically prove to be ineffective and risk re-infestations. This is because bed bugs shelter in the narrowest of gaps such as seams of mattresses, bedframes or behind furniture. Most of the time, many of them faced hassles and stresses dealing with an infestation

Take Action

Contact Rentokil today to get rid of your bed bugs problem and eliminate any stress or pest concerns you have in your home or business. Benefit from a range of services and complete protection offered by a leading pest control company. Join thousands of satisfied customers throughout Indonesia.

HOW TO CHOOSE A BED BUG EXTERMINATOR

Bed bugs are real, and they are not just for hotels or public quarters like hospitals, dorms, and nursing homes. They can and do infest houses anywhere. They do not discriminate. The presence of bed bugs does not indicate anything related to a home’s cleanliness. If you think that you may have these unwanted bedroom visitors than there is no time like the present to contact a professional pest control service. There are many pest control services out there to choose from. Now you have to figure out just how to choose the right one, and just like most things that we pay for, it doesn’t hinge solely on price

There are two major area’s to look at when considering a professional exterminator or pest control service. The first area is whether they are licensed appropriately with your state and what is their membership status on national, state and local pest control associations. Membership to these associations requires an evaluation of the company’s practices both in the field, ethically and their total overall business practice

The second thing to consider, once you have found some pest control companies that pass the test with the first area, is the scope and price of their services offered. A company that is offering a complete approach to bed bug control would offer such things as:

A multi-faceted approach to treating the infestation along with the use of pesticides (vacuuming, cleaning, steaming, using mattress encasements etc.).

An actual visit and inspection of the property before giving you a price, which means there is no ‘flat fee’ to rid you of your infestation.

Provide a written report of the inspection that includes a detailed description of the recommended services and the strategy to eradicate the infestation that doesn’t have a ‘minimum’ number of visits, but is based on the actual status of your property’s bed bug status.

Present a thorough program that includes not only the initial treatment(s) to get the bugs out, but will also include follow up visits to ensure that the treatment was successful.

In this, the age of information, no one should be going into any relationship with any professional service blind and uneducated. Bed bugs are nothing to mess with. Put your worries and concerns to bed by contacting a company that meets or exceeds this list of criteria.

Tips to Prevent or Control Bed Bugs

Make sure you really have bed bugs, not fleas, ticks or other insects.

You can compare your insect to the pictures on our Identifying bed bugs Web page or show it to your local extension agent

Don’t panic!

It can be difficult to eliminate bed bugs, but it’s not impossible. Don’t throw out all of your things because most of them can be treated and saved. Throwing stuff out is expensive, may spread the bed bugs to other people’s homes and could cause more stress.

Think through your treatment options — Don’’t immediately reach for the spray can.

Be comprehensive in your approach. Try other things first. Integrated pest management (IPM) techniques may reduce the number of bed bugs and limit your contact with pesticides. If pesticides are needed, always follow label directions or hire a professional

Reduce the number of hiding places — Clean up the clutter.

A cluttered home provides more places for bed bugs to hide and makes locating and treating them harder. If bed bugs are in your mattress, using special bed bug covers (encasements) on your mattress and box springs makes it harder for bed bugs to get to you while you sleep. Leave the encasements on for a year. Be sure to buy a product that has been tested for bed bugs and is strong enough to last for the full year without tearing.

Regularly wash and heat-dry your bed sheets, blankets, bedspreads and any clothing that touches the floor.

This reduces the number of bed bugs. Bed bugs and their eggs can hide in laundry containers/hampers Remember to clean them when you do the laundry.

Hiring a Pest Management Professional for Bed Bugs

Treating bed bugs is complex and many people hire professionals to lead the effort. Because professionals can be expensive, it’s important to research your options to find the best fit for you. We cannot recommend specific pest management companies or individuals, but we can provide you with information to help you find the best services for your needs.

Anyone you hire should use IPM, which will include monitoring for any bugs that have been missed during treatment. Because this is your home, you want to help too

To maximize your chances for success when working with a professional:

Get a pest management professional (PMP) involved as soon as possible. Taking time to try to treat the problem yourself could help the infestation to spread.

Prepare for multiple visits, as very few infestations are controlled with only one treatment.

Hire a PMP experienced in treating bed bug infestations. Check the company’s credentials.

Follow guidelines on how to prepare for control, which will include laundering and cleaning.

Expect the PMP to inspect your residence, take apart furniture if necessary and use vacuums, heat and pesticides to treat the infestation.

Read EPA’s Citizen’s Guide to Pest Control and Pesticide Safety, which offers more tips on how to choose a pest control company.

How To Choose A Wedding Photographer For Your Wedding

Here Is Your Guide for How to Hire a Wedding Photographer

For a lot of people, figuring out how to hire a wedding photographer is usually done fairly early in the planning process. This is probably for a few reasons. It feels like one of the bigger wedding planning tasks (because it is, if you’re hiring a photographer), and if you’re planning to shoot engagement photos or additional portrait sessions, you want to go ahead and plan those out. Plus, some wedding photographers book out well in advance (and there are only so many weekends during wedding season), which means locking in the photographer of your choice is all about timing. Or is it? Yes, obviously, timing is mega important… but when it comes to your photographer, there are other things you need to consider early in the planning process.

KNOW WHAT STYLE YOU LIKE

I don’t mean that you need a perfectly curated Pinterest-friendly Instagram feed before you start looking for your wedding photographer, but I do mean that you should have some kind of visual idea of what you want your photos to look like. Are you into darker, moodier photography? Cool, then don’t go with someone who skews toward overexposure. Do you want someone who shoots with film? Great, make sure you include that in your search terms. Are you ultra into an abundance of natural light? Sub-question: Will your venue actually be filled with natural light? Awesome, find those people. If you’re feeling totally lost, ask people you know who have amazing wedding photos who they hired, and go from there.

KNOW YOUR VENUE

Remember what I just said about natural light? Okay, good. I am personally a huge fan of natural light and venues that have tons of it, and a lot of my work reflects that. That’s because I intentionally share photos that I think best showcase what I do—and that’s what a lot of photographers do. So if you’re getting married in a dimly lit room and you hired someone who usually shoots outside in fields, just know that your photographer can’t transport all that light into a room that doesn’t have it. Sure, your photographer can and should be able to work with any venue, but if you’re choosing a photographer because of what that person excels at, it’s helpful if your wedding fits the bill.

Review Albums With a Critical Eye

When reviewing a photographer’s album, look for the key moments you want captured: Did they get photos of both the bride and the groom when they locked eyes for the first time? Also look for crispness of images, thoughtful compositions (does a shot look good the way it was framed, or is there too much clutter in the frame?) and good lighting (beware of washed-out pictures where small details are blurred—unless that’s the style you’re after). It’s also very important that you detect sensitivity in

capturing people’s emotions; make sure the photographer’s subjects look relaxed, not like deer caught in headlights. While you two are important, of course, you want to see smiling shots of your friends too.

Ask About Your Rights

Most contracts stipulate that the photographer owns the rights to all photos taken at the wedding, even the ones of you. In other words, the photographer can use them promotionally (on their website or blog, submit them for publication and even place them in ads). That also means you can’t just post the digital proofs they send you—most photographers have a policy that you can only share watermarked images or images with their credit on them. Also, unless you negotiate otherwise, if you want to print the images yourselves or order an album from another source, you’ll have to buy the rights to the images.

Prep Together for the Day-Of

Remember that your photographer is the pro, so—while it’s helpful—you shouldn’t spend too much time putting together a detailed shot list for them. Instead, pass along your day-of timeline, give them an idea of what images you’d like captured (like a shot with each of your bridesmaids in addition to wedding party portraits) and let them do their thing. This is also the perfect moment to give them a heads up on any familial or friendship intricacies they should be aware of, like divorced parents, a grandmother that needs to remain sitting for portraits or a groomsman and bridesmaid that don’t get along (hey, it happens!). If you’re hoping to get your wedding day published online or in a magazine down the road, be sure to relay that to your photographer. This way, they’ll put extra emphasis on snapping shots of all your amazing details and will likely come armed with gorgeous styling accessories, like ribbons, linens and more, with the goal of helping your wedding aesthetic truly stand out.

Wedding Photography Package For Your Clients

Ever wonder how to start making a wedding photography package? You may know an exact amount that you can charge from your clients. However, a breakdown of price will give a convincing idea to the couple for what they are paying to you.

Here’s a list of the things you need to include in your wedding photography package:

1. Number of Events to be Photographed

First thing that you need to discuss with your client is the number of events that need to be covered. You can divide it into number of days too.

Few of the wedding ceremonies last long and the client ask you to cover all the events. It is recommended to discuss the events in details before signing up the contract.

2. Number of Photographers Shooting the Wedding

Most of the wedding photographers have second shooters to cover the details of the all events. It is also a value added service to charge a good price from the client for delivering more in less time.

The wedding photography contract should include number of additional photographers that are assisting you in the wedding shoot. You can add or remove the second shooters on the basis of need of your client.

3. Number of Hours for the Shoot

For each event that you signed to shoot, you should talk about the number of hours. Most of the clients would expect you to be available for all day. However, you should charge on hourly basis to restrict the misuse of your services.

4. Number of Prints and Soft Copies to be Delivered

Printed photos and soft copies of the wedding ceremony are need to be decided in the photography package. You should talk with your client about the number of prints to be delivered. You can include these details in the contract, so there is no miscommunication and the process becomes easy for both.

5. Traveling and Accommodation for Destination Wedding

Those wedding ceremonies that needs traveling are far more exciting. Your client must pay all your expenses. It is recommended to discuss mutually about the flights and accommodation ahead of time.

You should also talk about the meals and other basics. This cost should be included in the wedding contract.

Thing to Consider

Before you walk down the aisle, run down the following list of questions, recommends when debating hiring a planner:

  • Do I have a really stressful job that takes up a lot of my time?
  • Am I planning a wedding out of town?
  • Do I want to have a great party but feel overwhelmed by the details?
  • Do we have a lot of family drama?

You should be booking your Photographer/Videographer at least 9 months before your wedding!

By this time, you’ll have already picked your venue, a theme/color scheme, an idea of a guest list, and a basic timeline of your wedding day. This is all useful to your Photographer because…

  • Once the venue(s) is set your Photographer can look up the locations to see where they can get the best photos of you, your significant other & loved ones
  • You will know who you will really want photos with, out of town family or friends, etc.  (Add to your shot list!)
  • The general timeline is useful so whether you are having a mix of traditions or unique wedding events, you can be sure your Photographer won’t miss a thing and capture all of your special moments
This entry was posted in Events on by .

All About Circuit Breakers

What Causes Your Circuit Breaker to Burst

Circuit Breakers are electrical components designed to protect us against the risks of electric shock and our homes against fire and other types of damage that can be caused by electrical faults. Each circuit breaker in your electrical switchboard typically protects one or more related circuits against overload, short circuit and earth leakage.

There are only 3 very simple reasons why circuit breakers trip:

Overloaded Circuits – The Main Reason a Circuit Breaker Trips

Have a look around your house at all the socket outlets. How many appliances are plugged into each socket outlet? Chances are you’ve got more than the circuit is designed for. Our increasing use of electrical and electronic devices puts more pressure on our electrical installations every day – sometimes to the point where the amount of electricity we use exceeds the amount that the circuit can safely give us without overheating or getting damaged. When this occurs, the circuit breaker in your switchboard will disconnect the circuit from the electrical supply.

Short Circuits – When Things Go Really Wrong

Whether you’re digging in the garden for the great new flower box, or drilling a hole in the wall to put up that lovely family picture, each time you make changes to the house you run the risk of damaging electrical cables concealed behind walls or in the soil. When you drill a hole through a cable or cut it with a spade, direct contact occurs between the individual wires in the cable. This is known as a short circuit. Electrical cables are not designed to withstand the current flowing in such a short circuit situation. In cases such as this, the short-circuit protection mechanism in the circuit breaker disconnects the electricity supply to ensure that the cable does not melt or catch fire.

Earth Leakage Currents

Sometimes known as ground fault current or residual current, this is electricity that flows from the electrical installation to the ground or other conductive materials of the house. Electrical systems are designed to pass current between the live conductors of the installation. When appliances like kettles, refrigerators and washing machines become faulty, they can allow current to flow through their metal parts into your body and down to the ground. This is a dangerous situation known as an earth leakage. Certain types of circuit breakers known as Residual Current Devices or Ground Fault Current Interrupters trip when they detect this current flowing to the ground to protect you from electric shock.

How Can I Tell If My Circuit Breaker Has Gone Bad?

You may think it’s gone bad, but circuit breakers trip to protect you from electrical issues short circuit, overloaded circuit) that could cause fires. So first we want to rule out these common problems before jumping to the conclusion that the breaker is faulty.

Step 1: Identify what circuit the breaker is protecting

Go to your circuit breaker panel and look for one of these 2 things:

  • A label next to the breaker that’s tripping
  • A sheet on the circuit panel’s door


These will tell you what circuit this break is protecting.
Once you know that, you need to…

Step 2: Unplug all electrical devices on that circuit

You want to rule out the case of an overloaded circuit (a circuit that has more amps flowing through it than it can handle). So unplug lamps, TV components, computer components and the like that are on that particular circuit.

Step 3: Reset the circuit breaker

When you flip the breaker, you should hear a definite click.  If the switch flops back and forth and there is not definite “on” or “off” position, the breaker is probably bad.

How Do You Know If a Circuit Breaker Has Tripped?

If power has gone off in a certain area of your home rather than all over the house, the problem may be a tripped circuit breaker.  Electrical circuits of your home are protected by either circuit breakers or fuses.  All homeowners should know the location of their electrical panel or fuse box, and the opening should be easily accessible and not blocked by shelving, boxes or furniture. If each circuit breaker or fuse isn’t already labeled, take the time to identify each switch or fuse and the particular area it controls. This will save you time and effort if a circuit or fuse trips/blows. If there are two breakers or fuses for one area, such as the kitchen, take care to detail which part of the kitchen each of the two switches controls.  For example, you might label one switch “kitchen appliances” and the other switch “kitchen counter outlets” or other designations as appropriate.

If a circuit breaker trips because it has exceeded its maximum amperage, the switch handle will have moved between the on and off position and may show a red area alerting you that it has tripped. Depending on your electrical panel, sometimes the “trip” causes only a slight movement of the handle, and you’ll have to look closely at the switches to discern which one has tripped.

Circuit Breaker Warning Signs

We care about maintaining the value of your home, so make sure you’re aware of these circuit breaker warning signs:

1. Burning Smell in the Electrical Panel

One way to tell if you need a circuit breaker replacement is to sniff around and see if you smell a burning odor coming from the panel. If so, that means the wires and insulation have become overheated. Ultimately your circuit breaker is failing to protect your home from an electrical short elsewhere. Shut off the main power to the house immediately and call an electrician for an emergency service before it’s too late.

2. Breaker Will Not Remain Reset

After several months of resetting your circuit breaker, it might seem like it won’t stay on for a period of time. Boom, warning sign number two. This means the circuit breaker has failed, so hire an electrician to check the entire circuit. He’ll be able to diagnose it and ensure no further damage was done to the wiring.

3. Physical Damage

Seeing scorch marks around your circuit breaker, outlets, or other electrical appliances? Then that means the wiring has melted and failing. There’s a good chance your electrical panel breaker needs immediate service. A melted wire is one bad step away from your whole home lighting on fire. Call an electrician immediately and unplug all fixture from that circuit breaker.

4. Breakers Tripping Frequently

If it seems like every time you turn on an electrical appliance, your circuit breaker starts tripping, then you’re dealing with an outdated breaker. Circuit breakers are designed to trip when too much power is being drawn through it. It’s very frustrating dealing with a tripping circuit breaker. Each time you turn on your microwave or vacuum, you’ll find out immediately whether your breaker is tripping and if it’s ready to fail. Call an electrician who will determine whether it’s a bad breaker or if you need to add a circuit to your home.

5. Old Age

Another warning sign of a failing circuit breaker is simply if it’s too old. Circuit breakers are supposed to last for decades. However, if you’re regularly checking your breaker or haven’t had it inspected in a while then it could very well be failing without you knowing it. Having an electrician inspect your panel is a wise investment, especially for those of you who haven’t done so in the past 10 years…

Ground Fault

A particular type of short circuit, a “ground-fault,” occurs if a hot wire comes in contact with a ground wire or a metal wall box or touches wood framing members. Ground faults can be especially dangerous when they occur in areas with high levels of moisture, such as kitchens or bathrooms, or in outdoor locations. A ground fault carries a definite risk of shock.

There are steps you can take to identify and fix a ground fault, but also essential steps you should take to prevent one from occurring in the first place. For example, in areas where direct contact with the ground or water is possible, building codes may require that outlets be protected with GFCIs (ground-fault circuit interrupters).

As with hard shorts, a ground fault causes an instant reduction in resistance and an immediate increase in electrical flow. This causes the internal mechanism of the circuit breaker to heat up and trip. As with hard shorts, if a ground fault is present, the circuit breaker may trip again immediately after you reset it.

How To Manage Costs Of Residential Electrical Remodel

Residential Electrical Explains Converters and Voltage

Many people who travel to or from the United States run into problems when they try to use electronics like a laptop or hair dryer. This is because the American 110 volt power system is different than the European 220 volt electricity. Without a converter, devices can fail or become damaged. Even the electrical system in use can be damaged. Always use caution when operating devices in another country and check the voltage before plugging them in.

Voltage Difference between US and Europe

The United States is one of the only countries that currently use the 110 volt / 60 hertz electrical system. Most countries use a higher voltage system that handles 220 volts at 50 hertz. Appliances and electronics in these countries are designed to only work with the electrical system in that area. Because the voltage in Europe is twice that of the American system, plugging American devices into a European electrical system without a converter can destroy the device and even cause a fire. Devices intended for the 60 hertz cycle may not be able to function on the 50 hertz system as well.

Using Products Abroad

Using your devices in another country often requires the use of a converter. To see if the device needs a converter, check the information panel. Many manufacturers design electronics to work with range of voltages and these products will list acceptable input levels as 110-240 volts. If a specific voltage is required, the item needs a converter to work outside this range. Always look at the wattage requirement of the product before buying a converter. A residential electrician can recommend a good converter that has a higher wattage rating than the device, which prevents malfunction.

Advantages of the 220 Volt System

Although it has more safety risks, the 220v system used throughout Europe can reduce energy use and the electrical load.

There is no clear winner between the 110 volt and 220 volt electrical systems. It is important to remember the differences and risks, however, when traveling to a different country. Using electrical devices on a system they were not made for can cause fires or cause the device to malfunction or break. A trained residential electrician can recommend the right converter to use electrical items on any voltage system.

How do I increase voltage in my home?

You need to find out if the AC voltage to  your house is “normal” or if it has drooped to a lower value due to large current demand in the neighborhood.  It is the task of the power company to supply the normal voltage to your house.  If it is too low, they need to fix something.  In principle you could use a step-up transformer to raise the voltage, but a transformer big enough to handle the load current of an air conditioner could be expensive.  I would not try that first. 

Now, if the voltage to your house is normal, you may have an air conditioner that is intended for use with a different voltage.  Like trying to run a 220V input unit from 110V (if you are in the USA).  Or maybe the air conditioner has a leak and has lost coolent.  More input voltage won’t help with that.

How to Convert 120v to 240v? Voltage Converter Application

120V (110v) outlet can power virtually any standard device you can imagine, from tiny handheld electronics to large appliances. However, the item you want to use may require the higher 240V (220v, 230v) outlet. Fortunately, converting your outlet from 120V to 240V is a relatively simple project. Moreover, buying a reliable voltage converter will make the job even easier.

Gather Your Tools, and Turn Off the Power
The tools needed to convert an 120V wall outlet to a 240V outlet include screwdrivers, a neon voltage tester, and a black marker. You also need a 240V receptacle and a double-pole circuit breaker. Turn off the power at the main circuit breaker to avoid electrocution while you are working. Even with the power off, the terminals and wires on the main breaker carry an electrical charge, so you should never touch them for any reason.

Remove and Disconnect the Outlet Breaker and Wires
Locate the specific terminal that governs the 120v outlet, and loosen it with the screwdriver. Next, remove the wire connected to the terminal. Carefully pop the breaker off of the panel, and set it aside. Locate the neutral terminal by following the white wire, and loosen the screw. Pull the wire off the bus bar, and color the last few inches of the wire with your black marker. This makes the wire easier to identify and easier for our 120v to 240v converting job.

Install the Double-Pole Circuit Breaker
Hook the two tabs on the back of the 120v double-pole circuit breaker to the lock bar inside the breaker panel. Press the tabs firmly, and immediately switch the new breaker off. Locate the two terminal screws on the new breaker and loosen them. Slide the wire previously connected to the old breaker into one terminal and tighten it. This step must be done carefully, in order to achieve 120V transform to 240V.

Install the 240V Receptacle
Slide the prongs of the neon voltage tester into the existing socket to ensure it does not contain a current. If the lamp on the tester doesn’t light up, you can proceed. Remove the screw holding the 120V outlet cover in place, and pop it off. Remove the screws holding the receptacle in place, and slide it out of the electrical box. Remove the white, black, and ground wires from the receptacle by loosening the screws on the corresponding terminals. Locate the green ground terminal on the new outlet, wrap the end of the ground wire in a clockwise U-shape around the screw, and tighten it firmly. After this step, we finally managed the operation of 120V to 240V converting.

Test the Device
Turn the power back on at the main service panel, slide the prongs of the neon voltage tester into the new socket, and test to ensure it is working. Additional lamps will light up to indicate the new, higher rating. Be sure that the new breaker only covers the new 240V outlet, since more coverage can cause electrical or operation problems with additional powered components. Now, you can safely use your appliance on the 120V to 240V power outlet.

How do I know if my device is single voltage?

If you see something on the power label that looks more like 110V AC or 120V AC, it’s a single voltage device. Single voltage devices require a plug adapter AND a voltage converter and/or a transformer for international travel. To determine now what model of converter you’ll need, you will have to figure out the wattage of your device and purchase a voltage converter that complements that. Read on for all you need to know about watts.

Watts: Watts (W) measure how much power a device uses. You can find out the wattage of your device by looking for the W on the power label.

A low-watt range is typically 23W to 50W, which is usually the wattage range of the most common travel electronics. But many heating devices needing a higher setting can consume between 1000W and 2000W. You need to know the wattage of your device in order to determine the appropriate voltage converter to purchase so look on the indications label of your device for the W to get this information. Then, be sure to buy a converter with a wattage rating that is two to three times higher than the device you plan to operate in order to safely convert. For example, for an appliance rated at 400 watts, you should get a converter that is at least 800 watts.

What Would Cause Low Voltage in House Wiring?

One of the most common causes of low voltage is the overload of the system. Different times of the day, such as early afternoon, are typically high demand times. As is well known, hot days and weeks of the summer can cause a surge of power demand for air conditioners, a very power hungry set of machines. When the power company detects a large surge in demand, it will engage in the standard 5 percent reduction in power per home in a region. This can be a cause for under- or weak voltage.

Less well known is the concept of distance. Utility Systems Technologies in New York issued a paper in September 2009 dealing with both the causes and solutions to low voltage issues. One of the claims made is that homes at a great distance from the main power plant or generator will receive a lower amount of voltage than homes that are closer. This is particularly the case in spread-out rural areas. The problem here is “low load density.” This means that electricity must travel farther. In urban areas where people live close together, the increased density of “thickness” of the electrical signal is conducive to higher, or at least more regular, voltage per home.

Make An Old Home New With A Home Renovation Contractor

How to choose a home remodeling contractor

So you’re ready to put in a new bathtub, or you finally picked out that new tile for your kitchen. If you don’t want to do the work yourself, or you don’t have the time or skills to tackle a DIY home improvement project, hiring a contractor is the way to go. But choosing a home improvement contractor can be a headache: How can you tell if someone is good at a job you don’t know how to do?

When you choose a contractor, you’re hiring a new employee for a job. You wouldn’t hire the first applicant for a job at your business, so don’t choose your home improvement contractor without narrowing down the best candidates. Examine portfolios of previous work, check licensing, listen to referrals and gather competitive bids before you make a final decision.

Get recommendations

The first step in finding the right home improvement contractor is to create a list of 10–15 local contractors who have the right expertise. You’ll gradually narrow down this list to the top contenders and ultimately use it to select your contractor, so it’s best to include more names than you’ll need at this point.

Red flags

Successful contractors will make it easy for you to get in touch with them and see examples of their work. Be cautious of home improvement contractors who lack basic information, such as a website, social media presence and reviews

Compare each contractor’s portfolio

Choose a contractor who specializes in the type of remodel you need; someone who specializes in remodeling kitchens might not be ideal for your bathroom renovation. A home improvement contractor with a creative eye can also be helpful for certain projects. For instance, if you want to lay a tile entryway with a detailed mosaic or paint a room with a faux finish, you’ll need a contractor who does that type of work well.

How to Choose a Remodeling Contractor

When choosing a contractor to head up your remodel, these simple steps can mean the difference between complete confidence and sleepless nights.

Ask for Referrals

Word of mouth-hands down, is the best way to find a qualified professional to tackle the job. Ask relatives, friends and neighbors whom they’ve had good experiences with. And ask what made it a positive experience, how the contractor handled problems and whether he or she would use the same contractor again.

Look at Credentials

With recommendations in hand, do some preliminary research, whether it’s with a phone call or a visit to the contractor’s website. Find out whether he or she holds all the required licenses from state and local municipalities, along with designations from any professional associations such as the National Kitchen & Bath Association, the National Association of the Remodeling Industry and the National Association of Homebuilders. Look for contractors who have invested in course work and passed rigorous tests to earn particular certifications. Be aware, however, that not all certifications are created equal. Do some homework and find out the requirements.

Interview Candidates

Narrow down the list of contenders and set up meetings. Try to keep it to three contractors, because things can get confusing beyond that. How a contractor answers questions is extremely important, but communication goes both ways. Candidates should ask plenty of questions, too

Check References

Ask to see some of the contractors’ projects. If you approve of them, request references and call contractors’ former customers to check up on them. Ask how the contractors did at executing the projects. Were they on time and on budget? Were the customers pleased with the outcome? Was there anything that could have been done differently?

How to Choose the Right Home Remodeling Contractor

Often times, the hardest part of starting a home remodel is choosing a remodeling contractor. What do you look for? Do you hire an architect or a design-build firm? How do you choose? Searching for the right contractor takes work. To make it easier for you, and to ensure your experience is as enjoyable as possible with the fewest regrets, we’ve put together a few steps for you to consider as you begin the selection process.

Know What You Want and How You Want to Live

Beyond knowing what you want your kitchen or bathroom remodel to look like or where you want to add or expand living space in your home, you should also consider having an important conversation with your remodeling contractor about how you plan to live, work and play in your home (in 5 years, 10 to 15 years or even a lifetime). Do you have plans to keep your home in the family for many generations? Do your family members have any health or physical needs that will need to be accommodated now or in the future? How does the flow in and around rooms currently function for you? What challenges are you experiencing with your home, or anticipate in the future?

Decide Which Delivery Method is Best for You

If you’re considering a major remodel, it’s important to explore the two most common delivery methods for your home remodel. Many homeowners start by hiring an architect, working with him/her to come up with a plan set, then shop around for a building contractor. With this approach, the homeowner makes decisions about almost every detail of the home remodel design and building process without any input from the contractor.

Ask for Referrals from Friends & Family

Reputable home remodeling contractors generate glowing recommendations. When you’re ready to remodel, be sure to ask your friends, family, neighbors, and other acquaintances to identify a remodeling contractor that they trust and would use again. Asking for a recommendation helps you narrow down your selection, and may also help you determine which contractors to avoid. Look for someone who has experience in your neighborhood or specific remodeling expertise (e.g., you need someone who has experience remodeling kitchens).

Review Their Reviews

Put your computer to work and take the time to read online reviews. And, look for places where reviews are hard to fake, such as Houzz, Google, Yelp and a third party customer satisfaction surveying service, like GuildQuality. What are people saying about the company and their experience with them? And better yet, how is the home remodeling contractor addressing complaints? Look for someone who is able to provide quality references and don’t be afraid to ask to see some of their completed projects in person or to speak to their past clients! This simple exercise can tell you a lot about your contractor prospects and help you hire the right one.

HOW TO CHOOSE THE BEST LOCAL CONTRACTORS FOR YOUR HOME RENOVATION

Are you dreaming of a new kitchen, an updated bathroom, or about adding a room to your home? Or perhaps you’re in the process of building your dream house? Before you can start any of these projects, you need to find the right local contractor for the job.

Use the Right Search Engine

Before you can choose the right local contractors for your home remodeling project, know where to look for. You could go to Google and type in “local contractors.” But while Google’s algorithms will bring you a few local businesses, it will also bring you plenty of others that are far away.

Find a Specialist

Different types of work you need to have done around the home require a different type of contractor. No matter the type of work you want to do, there’s at least a few local contractors out there who would be great for the job. The trick is finding them.

Check the Reviews

Once you’ve narrowed your search, assess your options. Luckily, online reviews make this a breeze. They are just as good as asking a friend or neighbor for their opinion.

Screen Potential Contractors

Once you’ve narrowed down your search to contractors with great online reviews, it’s time to start screening. This is an important step. Websites allow you to book services online, and can make it tempting to skip this step. But resist the temptation.

Here Are The Interview Questions To Ask A Potential Contractor

Dreaming up a new kitchen or spa-worthy bathroom may be the most fun part of renovating, but choosing the right renovation contractor is the most important part. This person will rip out your walls and spend your money, so it’s really important that you like and trust them enough to embark on the remodeling journey together.

Customers are your best sources for information, so don’t be afraid to ask a potential contractor if you can speak with their past customers. Put on your reporter’s hat and ask questions like, “Were deadlines and expectations met?” and “What were your best and worst experiences?” Christina Hoffmann, content manager for HouseLogic.com, recommends checking online reviews, too. “Look at Yelp, Angie’s list, and online forums,” she says. “Make sure you’re seeing the full gamut of what people are saying.”

Don’t just ask for an overall price estimate. “One of the most important questions to ask is, ‘Can you itemize prices?'” Hoffmann says. “Then you can compare apples to apples. If prices are not itemized, you don’t know what they’re charging for.” An itemized list also lets you identify areas where you can make changes to shave costs.

Remodelers must perform quality work and maintain a good reputation to stay in business—plus, you’re paying for their relationships with other contractors or suppliers. “Ask how long they’ve been doing business locally,” Hoffmann recommends. “You want them to be established and have an established team of subcontractors.”

Most states require contractors to pass an exam and take annual education courses to maintain a current license; insurance covers employees. That way, if someone gets hurt on the job, the company’s insurance covers the medical bills. Otherwise, an injured worker could come after you, the homeowner, to foot the bill. A surety bond is liability for you in case the contractor doesn’t finish the job or goes out of business.

How To Find The Right Wedding Videographer

How to Choose a Wedding Videographer: The Essential Guide

What Does Wedding Videography Involve?

Forget the dreary, out of focus and wobbly videos you may have seen in the past, the new breed of wedding videographers are producing high quality and imaginative wedding day films.

Is it Expensive?

There are of course many different wedding videography companies to choose from and they all vary in cost, quality and style.

Which Style of Wedding Videography is Right for Me?

The style of your wedding and the overall atmosphere of the day should be conveyed clearly in your wedding video –a good videographer will know how to capture this. If you prefer your video to be raw and not too edited, then a traditional style of wedding videography is right for you.

How to Get The Best Wedding Video Ever

Hire the Person Whose Style Most Closely Matches Yours

Just like photographers, videographers take different approaches to their craft. Documentary-style videos present the events chronologically, without many special effects, while a cinematic film is generally more dramatic, using interesting angles for a Hollywood-movie feel (these are just two options of many). “You don’t want to select a cinematographer with one style and send them clips from another videographer with a totally different style. Just hire the one you like!” says Taryn Pollock, owner of Serendipity Cinematography based in Arizona and California.

Take Finding a Videographer As Seriously As You Do Your Photographer

Unfortunately, hiring a videographer seems to get pushed back somewhere between welcome bags and favors—and it’s just too important for that C-list slot on your long list of to dos. “By that time, there will only be a handful of studios left to choose from, and most likely, you won’t be able to hire your first choice,” says Julie Hill, owner and creative director at Elysium Productions, an international videography firm.

Subscribe to Video Websites

There are plenty of places to find wedding videographers, but Vimeo and Love Stories TV are the preferred spot for most A-list picks to post their recent work. Aside from the big videography communities, you can easily search by location and even wedding venue to find clips from your reception venue and get ideas.

Embrace the Professional Referral Factor

People like your photographer and wedding planner have worked with videographers in the past and will be able to suggest filmmakers they’ve liked or that they’ve heard good things about through previous clients.

Tips for Choosing Your Wedding Videographer

Be sure that you jive with the videographer

When you bring a videographer on, you’re going to have to tango with them from the moment you sign the contract until months after your wedding during their editing process. You’re going to want to make sure that before you sign anything, you’re tangoing to the same beat.

Be sure you like the way their previous films tell stories

A bride once told me “There has yet to be a wedding video you’ve created that has not made me cry.” Whenever I get feedback like that, it feels awesome because it tells me I am doing my job. I am storytelling.

Make sure they have assistants to help split the tasks at your big day

I used to shoot weddings solo and I would not recommend it to my worst enemy. There is just too much gear, too many balls in the air, too little time, and too many places to be at once for it to go smoothly. Choose someone who will send at least two people out on your wedding day.

Don’t be afraid to budget for a videographer- quality often depends upon what you pay

A lot of brides still consider video a luxury item to add to their wedding if budget allows. I would say that with that mind set, you may not want to get a video at all because you could end up paying for something you don’t love.

HOW TO CHOOSE A WEDDING VIDEOGRAPHER

Budget

Budget is a total arse. But it’s an important thing to keep in mind when choosing a videographer because costs can range from as little as £200 – £5000 (maybe more) however there are some huge differences to be considered.

Style

Do you want a cinematic dream-like film which makes your day appear as magically as it felt? Or do you want to belly laugh at a sneaky shot of Uncle Bob picking his nose in the corner of the room? Or do you want both? Do you want to be taken away from your guests so your videographer can direct some beautiful shots of you smooching, whispering I love you’s, having a laugh together and making you look like the stars of romantic movie or are you happy for your videographer to hide in the shadows, capturing the more natural moments as they happen so you can chill with your guests longer? Do you want speeches running over the top of your film or do you want music to be the main audio? Different videographers have different styles of delivering a wedding video, they are different artists, some are Banksy, some are Da Vinci! What style do you like? Do your research, find the videos you’re most drawn to and then find the videographers that can deliver that within your budget. Perhaps consider using key words in your searches “Cinematic Wedding Videographer” “Fun Wedding Videographer” “Naturalistic Wedding Videographer” “Alternative Wedding Videographer” “Eco-Friendly Wedding Videographer” etc etc

Kit

There’s two parts to this; quality of kit, what are they using, what have they achieved with that kit. But perhaps more importantly, how much kit is there? Do you want lights beaming your way during speeches with 8 cameras dotted around the room so every angle/reaction is covered or would you prefer something more low key, less invasive and instead compromise on less angles? It’s not a top consideration but it’s certainly worth noting.

How to Choose a Wedding Videographer

COST OF A WEDDING VIDEOGRAPHER

Wedding videography packages usually range from $1K to more than $15K. Most wedding videographers charge a rate based on the amount of time they render their professional services. Others out there offer a preset package which also includes other pieces such as an extra shooter or a same-day edit. Even if you are just planning to buy a standard package, it is very important that you run through the other offers and what’s included. Some wedding videographers will also base their pricing on the number of guests and venue of the place.

STYLE

The styles of wedding videographers can vary. With this being said, it is quite tricky to find someone who can meet your expectations. Wedding videographers, just like the photographers, take different approaches and style to their craft. Documentary style wedding videos present the events in a chronological manner minus the special effects. They tend to lean on interviews of the guests and montages overlaid with snippets of conversation and catchy quotes.

EXPERIENCE

Although expert wedding videographers are preferred, up-and-coming, or new artists in the wedding videography industry will not do you any harm. If they have the equipment and you’ve identified you’re preferred style of wedding videography, then it’s matter of finding the right match!

EQUIPMENT

In order to create a cinematic wedding video, it’s crucial that you’re wedding videographer has the right tools. A wedding videographer without a high-end camera is like Leonardo Da Vinci without a paintbrush. They must have the right sound equipment, the lights and cameras that can handle low light situations (such as inside an old cathedral).

This entry was posted in Events on by .

All About Termite Prevention And Control

All You Need to Know About Termite Treatment Costs

Factors That Determine the Cost

There are a number of factors that play a vital role in affecting the overall cost of this procedure. Understanding these factors can help gain a better understanding of the approximate expense.

Size of Your Home

When it comes to the size of your home, the bigger the house, the higher the termite treatment cost. Why? Bigger homes are likely to suffer extensive damage compared to smaller homes. This is because before the infestation is found in a bigger home, it will have spread to several parts of your home. Also, it will require experts more time to inspect your big home compared to a small home. This does not mean you cannot save your home. To save your home, take steps to get rid of the infestation.

The Foundation’s Layout:

Your homes foundation plays a major role in determining the cost of a treatment. It is important for experts to consider the layout before delivering treatments. Monolithic slabs and a few other types of foundation require customised treatment procedures. Professionals also need to consider if there is space in your foundation to occupy a basement or any other space that can cause termites to have infested and destroyed the same.

Techniques Used

Termite control experts use many techniques to get rid of the infestation in your home.

Some of the methods used include:

  • Liquid chemical barrier
  • Non-repellent liquid treatment
  • Termite bait systems

Analysing the Approximate Cost:

Here is how you can consider an approximate cost for your expenses:

  • Measurement:

Measure your property and its external perimeter. This should be only up to 150mm from the wall. You will also need to count how many posts are attached to your property’s structure or building.

  • Chemical Choices:

Chemicals you can choose from are:

  • Termidor – Induces poison to kill termites by transferring the poison to the colony. 8 years of life recommended by the manufacturer.
  • Altriset – A safe and non-repellent chemical. 5 years of life recommended by the manufacturer.
  • Biflex – Poisonous repellent used to create a treated zone. This keeps termites away from your home.10 years of life recommended by the manufacturer.
  • Estimator:

Use the measurement and chosen chemical to judge the expenses based on an approximate cost of a termite treatment.

  • Reducing the Expense of a Termite Treatment:

Treating an infestation can be a costly affair impacted by the many factors stated above. No home owner wants to deal with extra expenses that cut a hole through their pockets.

The best way to ensure you aren’t paying for expensive treatments from time to time is to ensure that the curing of the infestation if based on the perimeter and not just the interior parts of your home.

You can also choose to consult more than one Pest Control Company to ensure you are getting the best price for your money’s worth. While trying to cut cost do not hire a cheap and ineffective pest control company to avoid having to deal with infestation again.

Good pest control companies provide you with estimates to know the cost before hiring them for their services. Avoid an infestation as much as possible to cut down on treatment expenses.

House of two floors in the forest among group of long pine trunks and other green trees

WHAT ATTRACTS TERMITES?

In general, termites create colonies around food sources. Because termites eat soft or rotting wood, they seek moist spaces. Homes, and the surrounding property, can accidentally create prime environments for termite colonies. These situations encourage termites to move from their natural habitats into developed areas. The following scenarios are most likely to attract termites to your home.

PILES OF WOOD

Firewood and woodpiles can attract termites, drawing them closer to your home. Then, termites will migrate from the piles of wood to the housing structure, causing great damage inside. To avoid an invasion, stack wood 20 feet away from your home and keep it at least 5 inches off the ground.

EXCESS FOLIAGE

As they rot, dead trees and stumps attract termites. Termites will migrate from this excess foliage to your home. To prevent this, clear stumps and dead trees from your yard.

TREE LIMBS AND LEAVES

Tree limbs and leaves that touch the roof attract termites to your home. These branches give termites a pathway from the ground to your house. Regular tree trimming can dissuade termites from migrating to your roof.

MULCH

Similar to tree limbs, mulch can draw termites closer to your home. The wood chips retain moisture, providing an attractive food source. Lower the likelihood of termites by keeping mulch at least 15 inches from your foundation.

CLOGGED GUTTERS

As leaves and twigs build up in your gutters, the excess moisture softens or rots your roof. These soft spots allow termites to penetrate your home. Clean gutters lower the opportunities for termites to invade by preventing a soft or rotting roof.

WHAT INFLUENCES THE EFFECTIVENESS OF TERMITE TREATMENT? 

The type of termite you are dealing with will also affect how long treatments last. Two types of termites are typically seen, subterranean termites and drywood termites. Subterranean termites are termites that live in the soil around the home. They create a network of tunnels to access their food source (your house). Drywood termites burrow into the wood and live and eat off it. They create a series of tunnels within the wood of your home and eat their way through.  The termite treatment you receive and how long that treatment will last depends on your infestation. We can help you identify the type of termite correctly and the most effective treatment.

Is Termite Protection Worth It?

Knowing the potential costs of termite damage and repair is reason enough to invest in termite protection. What options do homeowners have when a homeowner’s policy doesn’t cover termite damage? A termite bond or termite warranty is your best bet. A termite bond is a warranty between a homeowner and a termite company that functions as a maintenance contract for termite prevention, damage, and repair. Termite warranties vary by company, but they generally include an agreement for annual (or more often) termite inspections during the lifetime of the warranty, an agreement to provide treatment if termites are discovered (often at no additional charge to the homeowner), and in some cases an agreement to repair damages. Not all homes, however, qualify for these repair bonds so always check with your termite control provider about this.

A termite warranty provides you with peace of mind against termite damage. The warranty guarantees that the pest control company will continuously inspect your home and make sure that new infestations are discovered before they can proliferate. Termite warranties are also beneficial when buying or selling a home as they are often required before a sale can occur. Lenders will often not approve mortgages for at-risk homes without a termite bond. Only certified pest control companies can issue termite warranties. Yearly costs typically run $300-$400 for the warranty coverage, which includes the annual termite inspection.

Hydro Jetting Service To Solve Plumbing Issues

HOW SHOULD I KNOW IF HYDRO JETTING OR SNAKING IS THE BEST CHOICE FOR DRAIN CLEANING?

When you have a clogged drain, you probably are only worried about getting it resolved quickly, regardless of the method used. This is why many homeowners rely on chemical drain cleaners to corrode clogs and quickly get the drains moving smoothly again

homeowners don’t know, however, is that chemical drain cleaners damage your pipes and create weak spots that are prone to burst. This is why professional drain cleaning methods are always preferred. Hydro jetting and snaking procedures are fast, efficient and safe for your drains. They will quickly remove clogs and get your drains clean in no time.

HOW DOES HYDRO JETTING WORK?

Hydro jetting is a popular choice because it’s fast, effective and completely safe for your drains.

WHAT IS SNAKING?

Snaking refers to using a cable with an auger-like blade attachment to chew and digest simple clogs. The technician will insert the cable into the drain and feed it through until they feel resistance. When they feel resistance, that indicates the clog has been reached.

WHEN SHOULD I USE A PLUMBING SNAKE?

Snaking is best reserved for simple or one-off clogs. Emergency clogs are often cleared with snaking because it’s quick and efficient. Snaking is not ideal in situations where the drains are overly dirty or if there is an abundance of hardened clogs in the pipe. These circumstances are best suited for hydro jetting. Hydro jetting is also preferred when there is a recurring clog because the water jet works better at permanently repairing the situation.

Hydro Jetting vs. Snaking: Finding the Best Drain Cleaning Method

If you notice the water in your sink start to rise when it should be draining or if your toilet is taking a long time to fill back up after flushing, don’t panic. You probably just have a clogged drain. These plumbing issues may seem serious, but they are very common and, in most cases, easy to resolve

How Does a Drain Snake Work?

Snaking the drain is a process that involves inserting a cable into the drain. At the end of the cable, there is an auger-like rotating blade. On the opposite end, there is a crank for the technician to operate. As the technician feeds the cable deeper into the drain, they’ll wait until they feel resistance to stop. Once they feel resistance, that means the clog has been located.

What is Hydro Jetting?

You can probably guess by the name that hydro jetting involves a jet of high-pressure water to clear out years of clogs from the drain. This high-pressure method is fast, powerful and effective.

When to Use Snaking over Hydro Jetting?

Snaking is often the first line of defense against an unexpected clog

Are There DIY Versions?

Snaking is relatively easy for a homeowner with a knack for home repair to try on his or her own. Hydro jetting, however, is not. The dangerous water jets are powerful enough to cause harm to your home if they get out of hand or are not operated by someone with experience and training.

Hydro Jetting, Snaking, or Chemicals & How to Know Which is Best for Your Clog

Do you have a clogged drain? Then you are probably wondering how to get it resolved quickly, regardless of the method. This, unfortunately, is why so many home and business owners go to chemical drain cleaners to try to clear clogs. However, these chemical drain cleaners can actually damage your pipes and create weak spots that can become prone to leaks or bursts. That is why professional drain cleaning is preferred over those corrosive chemicals. Professional methods such as hydro jetting are fast, efficient and safe for your drains. They can quickly remove clogs and get your drains clean in no time; and they are easy on pipes! As experts in hydro jetting for Minneapolis, we would like to tell you more about these methods and why you should choose hydro jetting services over chemical drain cleaning.

Hydro jetting is a popular choice among professional plumbers because it is efficient and completely safe on your drains. Using a high-pressure water jet, our technicians at All Ways Drains can quickly clear out years of hardened debris from your drains. The water jet is also powerful enough to smooth the inner texture of the pipe, which gets rid of any porous patches that form clogs. This prevents future clogs before they start and gets your pipes back up and working like they should.

The major benefits to hydro jetting versus chemical, cable or snake cleaning is that water jetting is much more effective on grease clogs and things like sludge, dirt and sand. Where a cable just tends to pass through these items and spread them out, the water-jetter is capable of actually cleaning these materials from the pipe and getting it out of the pipe rather than basically spreading it through the pipe. It is also actually possible to cut roots faster and better with the water-jetter.

Many people might think hydro jetting is only for commercial use. However, it is more than appropriate for residential home plumbing troubles. Hydro jetting is a versatile system and works well for both large and small jobs. Even the toughest clogs can’t stand up to hydro jetting!

Why Choose Hydro-Jetting For Your Commercial Drain Cleaning?

Clogged drains and pipes can be an annoying and expensive problem. There are many different ways to solve a blocked drain, yet they can be time-consuming and burn a hole in your pocket. Continue reading to discover the benefits of hydro jetting, the best solution for commercial drain cleaning!

Hydro jetting: What is it?

Hydro jetting is also known as indirect pressure drain cleaning. It’s a popular blockage clearing option and it’s commonly used when there is considerable sediment to cleanout. Essentially, an experienced plumber will use a pressurized hose to spray water down the pipe. The water comes through a specialized nozzle that is specifically designed to clear away pipe blockages. The strength of the water jet will ensure that all debris and mineral build-up will be cleared away and the pipes will be effectively cleaned.

Natural solution

Hydro jetting is an all-natural solution to unclogging drains and pipes. It’s also quick and effective, so it’s the perfect option for businesses and homeowners alike. Clogged drains usually occur from hair, debris, and sediment gradually getting stuck in the drain. Hydro jetting doesn’t use any harmful chemicals, so it’s eco-friendly. On top of this, hydro-jetting also re-uses the water, so it reduces needless waste. It’s perfectly safe and doesn’t pollute the waterways. This is a great option for homes and commercial buildings that are situated near lakes, rivers, and streams

It’s an inexpensive option

One of the reasons that hydro-jetting is so popular is that it can save you money in the long run. This is because hydro-jetting thoroughly cleans the entire pipe, which prevents long-term issues. It doesn’t take as long as other methods do, so the cost of labor is a lot less than other methods.

It works!

Hydro jetting is one of the most effective and efficient commercial cleaning options when it comes to unclogging drains. A water jet quickly unclogs grease, sand, and sludge as well. Because of the water pressure, it shoots the sediments from the pipe, rather than just spreading it and dispersing it throughout. On top of this, a water jet will give the pipes a thorough clean. It will be good as new once a jet is finished with it. Without using a water jet, the problem will just arise again a couple of weeks following the treatment.

What is Hydro Jetting?

What is Hydro Jetting?

Hydro jetting is an effective method of cleaning drains and main sewer lines. A hydro jetting machine has a water storage tank and hose attachments that will blast water into the drain lines from approximately 1500 PSI for kitchen jetters and 4000 PSI for main sewer line jetters.

When Do You Perform Hydro Jetting?

Typically, hydro jetting of the main sewer line or kitchen line is not the first step to clear a clogged drain line. Heavy clogs that will not clear by routine snaking, area drains overflowing in the rain, in preparation of epoxy relining, or commercial preventative maintenance are ideal problem scenarios to consider hydro jetting.

What is Hydro Jetting Used For?

Hydro jetting is used to completely eliminate scale buildup and heavy root intrusion in main sewer lines, and heavy grease and scale buildup in kitchen lines. It is especially useful in commercial applications for restaurant lines due to excessive grease. When kitchen drain pipes get frequent use and have even minimal amounts of grease poured into them on a regular basis, they can quickly become full and close off the flow of water.

Kitchen Hydro Jetting Process

Hydro jetting for kitchen lines is an effective method of removing heavy grease buildup in kitchen drain pipes that snakes cannot clear. Plumbing contractors or drain specialists will attempt snaking the line with a kitchen snaking machine first to determine the cause of the clog. If the kitchen snake comes back with heavy buildup or hits a hard blockage further down the line, they may recommend a hydro jetter service to remove the buildup.

Main Sewer Lines

Common causes of main sewer line clogs include tree roots, heavy scale buildup, low spots and deteriorating or broken plumbing pipes. Hydro jetting is a great way to expel scale buildup from mineral deposits and root intrusion, but is not effective on broken drain and sewer lines.

This entry was posted in Plumbing on by .

Run Business Smoothly With Store Management And Pick And Packing Services

How To Choose The Right Packaging For Your Product

When it comes to choosing the right packaging material for your product, you can’t go wrong by paying close attention to the details. After all, packaging may just be one of the biggest factors in making your product a success.

The right packaging not only attracts consumers, it will keep your product safe in transportation and keep it fresh. This reinforces the quality of the brand and item when customers know they can count on a fresh item from when it hits the shelf to when it’s in their hand.

Packaging Budget

Before you begin any packaging endeavor, you must determine the scope of your budget. This will determine what kinds of materials you can use, and what you can spend making your design as enticing as possible.

Packaging Transportation

Once you have decided on the package design, it’s time to consider function. No matter how amazing the design, if the package doesn’t function properly, it will do you no favors.

Packaging Materials And Sustainability

When it comes to packaging materials, it’s a good rule of thumb to treat your products like you would treat yourself. Just as you would not want to live in a home that is too big or too small, the right space for the right packaging has great effect on the end result.

Tips for Choosing the Right Packaging Company

When selecting a packaging company, you want a partner you can rely on. Ideally, the company will have all the services and features your company needs; however, bear in mind these needs can change as your company grows and evolves

Quality Packaging

A high quality final product should be a top criteria and priority. Ensure that your packaging company will be using effective processes and procedures to calibrate, control and maintain high standards. Do they perform regular inspections, measurements and tests of their equipment?

Intuitive Customer Service

Customer service should go beyond just meeting your needs today; look for a package design and production company that’s committed to exceeding your expectations now and planning for your success in the future.

Experienced in Graphic and Structural Design

Your packaging company should be experienced in a range of key packaging capabilities and solutions. From retail packaging and displays to industrial packaging and engineering design expertise, Victory Packaging can meet any range of needs. A full-service packaging company, like Victory Packaging, can better serve you in every phase of your company’s growth and development.

A Range of Materials and Processes

Be sure your packaging partner is well-versed in paper substrates, structures, and styles. They should be able to facilitate ideal graphics integration and printing processes. Victory Packaging features a team of in-house structural engineers to assist you in all phases of ideation, concepting, design and rendering. Structural prototypes, animations, 3D renderings, and final artwork can all be provided to ensure high-quality results.

The Ultimate Guide: How To Choose the Right Packaging for Your Product

The way your product is packaged plays a surprisingly key role in how consumers respond to it. Good packaging can elevate your brand, justify a high price point, and serve as a key distinction between yourself and your competitors — and that’s just the beginning.

To understand why packaging is so important, you have to understand what your packaging communicates. There are a few fundamental elements of your product packaging: shape, design, materials, colors, and text. Each element communicates something about your brand both on its own and in relation to the entire package.

Determining the Basics of Your Package Design

Before you can select the best packaging for your product, you need to make some decisions up front.

What material do you want to use?

Your choice of material is one of the most important parts of your packaging design. Whether you go the paper or plastic route depends on your brand’s style and the product itself, though keep in mind that, overwhelmingly, consumers prefer paper packaging. 68% of consumers say they’re more likely to choose a product in a paper or cardboard package versus a plastic package, and 63% say paper packaging makes a product seem more high-quality.

How will your product be transported?

Durability is tantamount to successful packaging, and function and ease of transport should be considered when coming up with your package design. You don’t want to design original and eye-popping packaging only to have it lose its shape before it gets to its end location.

How to Choose the Best Contract Packaging Services

A contract packaging service, also known as a co-packer, is an organization that provides supply chain services such as warehousing pick-and-pack, equipment rental, and more. These companies can provide businesses with total turnkey solutions, or labour. Outsourcing your packaging and warehousing operations with a custom packaging company can benefit your business in many ways. But, before you settle on a co-packing company, it is important to make sure it is aware of your needs. By informing the contract packager of your goals, you’ll be able to discuss and identify if they are the right team for you to work with. Here are three important aspects to consider when choosing a contract packaging company.

Flexibility and Co-Packing of Packaging Service

Packaging and repackaging in the supply chain will always go through changes, and the co-packer should be able to guarantee their ability to respond quickly and make adequate changes to prevent any problems along the way. It is important to ask and find out how the company would meet challenges such as changes in planning, scheduling, and management. Many packaging companies will charge extra for last-minute or rushed projects, which you should expect. It is more important to focus on their ability to adapt to changes.

Capability and Location of Contract Packager

The company you desire to work with should never take for granted aspects such as maintaining machinery and the workspace required. You should ask your contractor what equipment they would use for your project, and request a walk-through of their recommended process. They should also have headquarters in close proximity to where your project will be the most effective. You should be able to reach your end customer or distribution centre as easily and quickly as possible. This will save you costs in terms of shipping and packaging. It will also help you build stronger relationships and explain your expectations clearly to your partner company.

Quality and Cost

Cost may be an important aspect to consider for your business, but it is not the most important factor that influences a successful packaging partnership. You should be budgeting 10% of the total cost for packaging, but be aware that this budget includes materials as well as paying your service vendors. Once you have considered the other factors, then you can negotiate your price with the contract marketing manufacturers as long as they are reliable, resourceful, and responsive to your needs

How to Choose a Pick and Pack Fulfillment Service That Saves You Time

Are you spending hours fulfilling orders to your customers? Your process is probably slow and laborious. Even after all the time you spend, you can still make costly mistakes like using a wrong shipping address.

What is Pick and Pack Fulfillment?

Pick and pack fulfillment is part of the supply chain management process. It’s the process of picking sold product, packing it, and then affixing a shipping label and invoice to the product.

Why You Would Want to Use a Pick and Pack Fulfillment Service

A streamlined picking and packing process isn’t an easy feat.

Choosing a Pick and Pack Fulfillment Service

Here’s your problem now: there are many different pick and pack services to choose from.

Provided Services

First and foremost, you need to see what all services they provide. At the minimal, they should provide basic pick, pack, and shipping capabilities. That’s why you’re using them.

Well Water Testing Reveals The Truth

How to Choose the Right Test Kit For Your Well Water

Your decision on what to test your water for should be based on the types of land use near your well and what your goals are for using your water such as domestic use, irrigation, agricultural or commercial uses.

Why Should I Test My Well Water?

Municipal city water systems test their water supplies regularly to ensure that the water is safe to drink.  As a well owner, you are responsible for making sure your well water is safe.

Most private wells provide a clean, safe supply of water.  Contaminants can, however, pollute private wells.  Unfortunately, you cannot see, smell, nor taste most of them. Consequently, you should test your well water on a regular basis.

Most Common Reasons for Testing

A common reason many folks want to test their water is to improve the aesthetic quality of the water and eliminate iron staining, white scale build-up, corrosion, and/or odors.

Should I Use a Certified Lab, or Do It Myself?

You definitely use a state certified laboratory if you need a test report for bank financing or when you first purchase your home.

The Best Water Quality Test Kit for Your Home

If you’re worried about your home’s water quality—as many Americans justifiably are, in the wake of water scares in Flint, Michigan, and Newark, New Jersey—a home water quality test can ease your fears. After 50 hours of reporting, and after testing 11 different home water quality test kits, we’ve found that the SimpleWater Tap Score Advanced City Water Test is the best water quality test kit for your home. It measures a wide range of more than 100 potential contaminants and delivers the results in an easy-to-read, richly detailed report. If you’re worried only about lead, we recommend the much cheaper Safe Home Do-It-Yourself Lead in Drinking Water Test Kit.

The SimpleWater Tap Score Advanced City Water Test is a send-away kit: You take samples of your water, put them into a handful of bottles, and ship them off (using an included mailing label) to a certified laboratory. There, your water is tested for more than 100 compounds, including metals such as lead, mercury, and arsenic; volatile organic compounds (VOCs) like chloroform; bacteria; and industrial and agricultural compounds like pesticides and nitrates. Tap Score is not the only highly accurate send-away kit, but no other kit we tested delivered nearly as useful a report. Tap Score not only tells you, in plain language, exactly which compounds are in your water (and the amount) but also explains their potential health risks and suggests ways of addressing any concerns. Tap Score also offers unmatched online support. You can chat with a representative, and if your questions go beyond their knowledge, the questions are passed on to experts, who follow up with a detailed email. All of this makes Tap Score by far the most user-friendly and informative home water quality test kit we found.

If for some reason you are unable to use Tap Score, we recommend two runners-up: the WaterCheck CityCheck Deluxe and the Safe Home Ultimate Drinking Water Test Kit. Like Tap Score, these are send-away kits; you put samples into bottles and ship them to a certified lab. We found that the testing was just as accurate as Tap Score’s (and, in fact, National Testing Laboratories, which makes the CityCheck Deluxe kit, is among the more than 60 labs Tap Score partners with). But both of these kits are more expensive than Tap Score, and their reports aren’t as easy to understand. The reports are still much more readable than those of some other send-away kits: They’re color-coded, so you can quickly see contaminant levels of concern. But they lack Tap Score’s clear explanations, actionable advice, and robust online support. The CityCheck kit also lacks an included mailing label, so you’ll have to take a trip to the post office or another shipper.

Our budget pick, the Safe Home Do-It-Yourself Lead in Drinking Water Test Kit, doesn’t have to be sent away—you can get the results at home yourself. It tests only for lead, but if that’s your sole concern, this DIY test is a great option. The Safe Home Do-It-Yourself kit is widely available, inexpensive, and fast (the test takes a total of 10 minutes and less than 30 seconds of active work). And it delivers a clear positive or negative result: Your lead levels are either below the EPA standard or above it. You simply dip a strip of test paper into a sample of your water, and the presence or absence of a blue line tells you whether you have a lead problem. If you don’t, you’ll have peace of mind. If you do, you’ll know it’s time to enlist a professional plumber or an environmental service to help you find and address the source of the problem.

BEST WATER QUALITY METERS AND TEST KITS FOR DRINKING WATER

It’s famous for having perhaps the poorest drinking water quality in a first world country. You literally cannot drink the water as the city’s pipe infrastructure is rooted which resulted in lead leaching from the pipes and eventually into its citizens directly

There’s no need to use a water meter in Flint because the water comes out rusty red and the locals have to make do with bottled water.

We state this to highlight that water quality is massively important – from keeping the human population healthy right through to testing river pollution though to making kombucha or homebrew beer (pH levels are super important), there are a million reasons why brewers,

Home testing kits and meters are great because you can get fairly instant results and you certainly do not have to send off samples to an expensive laboratory or testing company!

You want the damn thing to be accurate. And frankly, you probably want laboratory results accurate because ‘near enough’ doesn’t cut the mustard when we are talking about drinking water or swimming in it!

Drinking Water Testing

Many consumers want to test their well or municipal water for contaminants and impurities. Without having your water tested, it can be difficult to determine whether you actually need a water treatment system or what type of system would be best for you. Here are some factors to consider when testing your water and selecting a filtration product.

Finding a Laboratory

There are many laboratories that offer private well testing and many states that have water testing laboratories available. For a list of well testing laboratories, visit the Water Systems Council website. If you choose to search online, you may want to use the keywords “accredited” and “water” to find a water testing laboratory near you. Accredited laboratories have been independently evaluated as technically competent to provide accurate test data. Additionally, these accredited laboratories are not typically associated with any industry or manufacturer.

Collection of Water Samples

Once you locate a laboratory, follow the instructions on collecting the sample properly to obtain the most accurate results. For example, if you are collecting a water sample for lead or copper testing, the recommendation is to let the water sit overnight and take a “first draw” water sample – meaning fill the sample bottle from the kitchen tap prior to running any water for the day. A second example would be for a coliform bacteria sample. To collect this type of sample, remove any screen from the water faucet. There is typically a recommendation to run the water prior to filling the sample bottle. These samples need to be kept cold so you should take the sample directly to the post office or keep it in the refrigerator until it can be mailed in or dropped off. Remember to closely follow the instructions for each test you choose to have analyzed.

Water Testing and Results

It can be challenging to determine what type of testing to do on your well or municipal water and the costs can add up. It may be helpful to visit your local health department’s environmental health division to ask for information on what has been typically found in groundwater in your area

Water Filters and Treatment Systems

In the last decade, interest in home drinking water treatment products has grown tremendously. Unfortunately, it isn’t always easy to know whether a particular product is as safe and effective as the manufacturer claims at reducing various contaminants in your drinking water. Should you choose to add a water filter to your home, it is important to look for filters and treatment systems with the NSF mark. NSF International certified products are your key to making sure they meet strict standards for public health protection. For more information on choosing a home water filtration system

How to test the quality of Open Water for bathing or swimming

There is always a greater risk of infection or illness caused by microorganisms when swimming in open water (lakes, rivers etc) compared to a chemically treated swimming pool. This guide aims to help identify most appropriate water quality monitoring and testing (Please note, our recommendations are only suggestions

Below you find a general summary of the guidelines in the United Kingdom (UK), which follows similar guidelines to the EU. In addition to this, please make sure that you always check your local guidelines to make sure that everyone is safe. If you plan to open your water to the general public you must strictly adhere to the guidelines set by the EU and UK, therefore please refer to the official guidelines.

How often should I check the water: It is recommended to check the quality of the water regularly, ideally at the start of the bathing season, every 4 weeks, before any event, when there are visible changes to the water, after heavy rainfall as well as at the end of the bathing season. The pH should be monitored more often as it can be an early indicator of changes, because it is affected by algal and weed growth, agricultural run-off as well as waste water from industry.

How to take a water sample: With the exception of algal blooms, samples should be taken 30cm below the water surface. Samples should be transported as soon as possible after collection in a cool box (we provide a cool box as well as ice packs) so that they arrive at the laboratory on the same day.

Sea water: This resource has primarily been created for water quality of inland waters, like lakes & rivers. Whilst the regulations may also cover sea water, our test strips & bacteria tests are not suitable to check salty sea water. To test marine/salt water